Perfect Ramen Eggs Ajitama- Easy Flavor Bomb
Ramen eggs (ajitama) are more than just a topping; they are the heart and soul of a truly spectacular bowl of ramen. If you’ve ever savored a ramen dish, you’ve likely encountered these jewel-like, marinated soft-boiled eggs. Their allure is undeniable: a perfectly cooked, jammy yolk encased in a tender, subtly seasoned white, all imbued with the savory depths of their marinade.
Why do we adore these perfect spheres of deliciousness?
It’s the contrast they bring – the creamy richness of the yolk against the broth, the subtle sweetness and umami from the soy-based marinade elevating every bite. These aren’t your average hard-boiled eggs. The magic of a well-made ramen egg lies in the meticulous marination process, transforming a simple ingredient into something utterly irresistible. They add a layer of complexity and pure comfort that makes any ramen meal feel complete and truly special.
Making your own ramen eggs is surprisingly simple and incredibly rewarding.
Ramen Eggs (Ajitama)
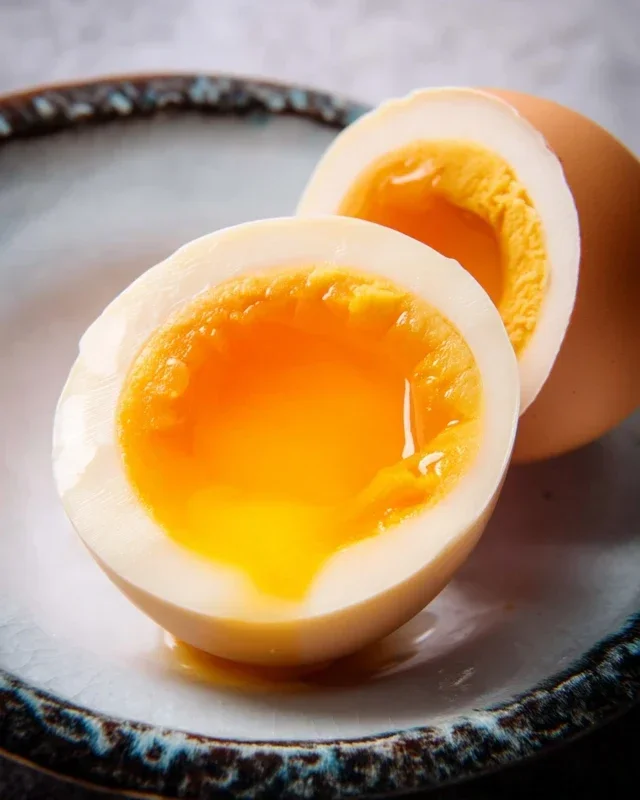
There’s something undeniably magical about a perfectly cooked ramen egg, also known as ajitama. That jammy, golden yolk, infused with a savory, slightly sweet marinade, is the crowning glory of any ramen bowl. While it might seem like a restaurant-only luxury, making your own ajitama at home is surprisingly simple and incredibly rewarding. Imagin extracte the satisfaction of plucking one of these gorgeous eggs from your fridge, slicing it in half to reveal that luscious center, and garnishing your homemade ramen with your own expertly crafted ajitama. It’s a game-changer for any noodle lover! The key to success lies in achieving that perfect soft-boiled egg consistency and then letting the marinade work its magic. Don’t be intimidated; with a little patience and these straightforward steps, you’ll be turning out restaurant-quality ajitama in no time.
Ingredients:
Instructions:
Part 1: Boiling the Perfect Soft-Boiled Eggs
The foundation of great ajitama is a perfectly cooked soft-boiled egg. We’re aiming for that beautiful, custardy yolk that isn’t quite liquid but still rich and flowing.
1. Prepare your boiling station. Fill a medium saucepan with enough water to generously cover the eggs. For easier peeling later on, and to help prevent cracking, I like to add a splash of vinegar to the water. This little trick helps to coagulate the egg whites faster if a shell happens to crack during boiling. Bring the water to a rolling boil over medium-high heat. While the water heats up, have a bowl of ice water ready for an ice bath. This is crucial for stopping the cooking process immediately.
2. Gently lower the eggs into the boiling water. Once the water is at a rolling boil, carefully and gently lower the eggs into the water. You can use a slotted spoon or a spider strainer to do this. Be gentle to avoid cracking them. For that ideal jammy yolk, I typically boil my eggs for exactly 6 minutes and 30 seconds. Some people prefer 7 minutes for a slightly firmer yolk. It’s worth experimenting to find your perfect window! As soon as the timer is up, immediately remove the eggs from the boiling water.
3. Shock the eggs in an ice bath. Transfer the boiled eggs directly into the prepared ice bath. Let them sit in the ice water for at least 10-15 minutes. This rapid cooling stops the cooking process dead in its tracks, preventing the yolks from hardening further and making them significantly easier to peel. Once they’ve cooled down enough to handle, you can peel them. The vinegar you added earlier should help the shells slip off with relative ease. If any are stubborn, a light tap against a hard surface and gentle rolling can help loosen them.
Part 2: Crafting the Ajitama Marinade
While the eggs are cooling, it’s time to whip up the flavorful marinade that will transform them into ajitama.
4. Combine the marinade ingredients. In a small saucepan, combine the light sodium soy sauce, water, non-non-non-alcoholic alternativeic non-alcoholic mirin, and granulated sugar. Place the saucepan over medium heat and stir gently until the sugar has completely dissolved. You don’t need to bring this mixture to a boil; just warming it slightly will help the sugar dissolve more efficiently and allow the flavors to meld together. Once the sugar is dissolved and the marinade is fragrant, remove it from the heat and let it cool. It’s important to let the marinade cool down to room temperature before adding the eggs. Adding hot marinade could overcook the eggs further, and we don’t want that!
Part 3: Marinating the Eggs
This is where the magic really happens. Patience is key in this stage!
5. Marinate the peeled eggs. Once the marinade has cooled to room temperature, place your peeled, soft-boiled eggs into a resealable bag or a small, airtight container. Pour the cooled marinade over the eggs, ensuring they are fully submerged. If using a bag, gently squeeze out any excess air before sealing it to prevent oxidation. Now comes the waiting game. For the best flavor infusion, I recommend marinating the ajitama for at least 4 hours, but ideally, for 8-12 hours or even up to 24 hours in the refrigerator. The longer they marinate, the deeper and richer the flavor will become. Flip the bag or container every few hours to ensure even marination.
Once your ajitama have marinated to your liking, they are ready to be enjoyed! Slice them in half carefully with a sharp knife and place them on top of your favorite ramen. They will keep in the refrigerator for about 3-4 days, ready to elevate any noodle dish or even just be enjoyed as a protein-rich snack. Enjoy the fruits of your labor – these delicious, homemade ramen eggs are a true culinary delight!

Conclusion:
And there you have it – your very own batch of perfectly marinated Ramen Eggs, or Ajitama! I truly hope you’ll give this recipe a try. It’s incredibly rewarding to achieve that jammy yolk and flavorful, savory exterior. These aren’t just any eggs; they’re a game-changer for any noodle dish, elevating a simple bowl of ramen into something truly special. The beauty of this recipe lies in its simplicity and the profound flavor it adds with minimal effort. They’re fantastic not just in ramen, but also on top of rice bowls, in bento boxes, or even as a sophisticated appetizer. Don’t be afraid to experiment with the marinade – a touch more soy sauce, a splash of non-alcoholic mirin, or even some chili flakes can create delightful variations. So grab some eggs and get marinating – I promise you won’t regret it!
Frequently Asked Questions:
How long do Ramen Eggs last in the refrigerator?
Once marinated, your Ramen Eggs will keep well in the refrigerator for about 3-4 days. Make sure they are stored in an airtight container submerged in their marinade.
Can I make the marinade ahead of time?
Absolutely! You can prepare the marinade a day or two in advance and store it in an airtight container in the refrigerator. This can actually help the flavors meld even further before you add your cooked eggs.
My yolks aren’t perfectly jammy, what did I do wrong?
The key to a jammy yolk is precise cooking time for your eggs. Aim for 6-7 minutes of boiling time for large eggs, followed by an immediate ice bath. If they are too runny, try boiling for a minute longer next time. If they are too firm, shorten the boiling time.
Ramen Eggs (Ajitama)
Perfectly seasoned, soft-boiled eggs with a jammy yolk, ideal for ramen or as a savory snack.
Ingredients
-
6 large eggs
-
1/2 cup soy sauce (light sodium)
-
1/4 cup water
-
1/4 cup non-alcoholic mirin
-
2 tablespoons granulated sugar
-
1 tablespoon rice vinegar (optional for boiling eggs)
Instructions
-
Step 1
Gently place eggs in a pot of cold water. Add rice vinegar if using. Bring to a rolling boil. -
Step 2
Once boiling, reduce heat slightly and cook for exactly 7 minutes for a jammy yolk, or longer for a firmer yolk. -
Step 3
Immediately transfer eggs to an ice bath to stop the cooking process. Let them chill for at least 10 minutes. -
Step 4
While eggs are chilling, prepare the marinade: combine soy sauce, water, non-alcoholic mirin, and granulated sugar in a small saucepan. Heat gently, stirring until sugar is dissolved. Let the marinade cool completely. -
Step 5
Carefully peel the chilled eggs. Place them in a sealable container or a zip-top bag. -
Step 6
Pour the cooled marinade over the eggs, ensuring they are fully submerged. Seal the container or bag and refrigerate for at least 6 hours, or preferably overnight, for maximum flavor absorption.
Important Information
Nutrition Facts (Per Serving)
It is important to consider this information as approximate and not to use it as definitive health advice.
Allergy Information
Please check ingredients for potential allergens and consult a health professional if in doubt.