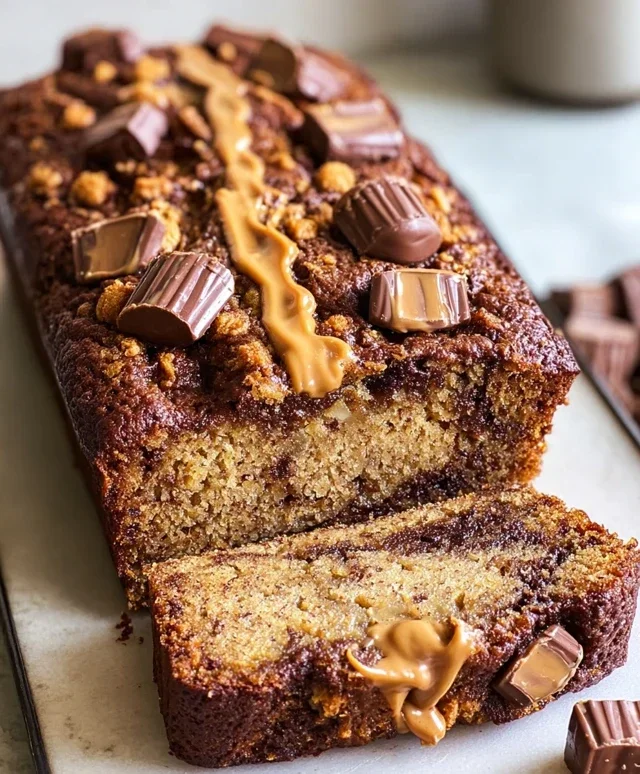
Reese’s Peanut Butter Banana Bread Recipe
Reese’s Peanut Butter Banana Bread. Oh, that name alone conjures up a symphony of sweet, salty, and utterly comforting flavors. If you’re anything like me, the mere thought of combining creamy peanut butter cups with moist, ripe banana bread sends your taste buds into a delightful frenzy. This isn’t just any banana bread; it’s an upgrade, a decadent dream made a reality. We all love classic banana bread for its nostalgic warmth, but when you introduce the irresistible allure of Reese’s peanut butter, something truly magical happens. The rich chocolate and peanut butter pockets, melting into the tender crum extractb, create an experience that’s simply out of this world. Get ready to elevate your baking game and create a treat that will have everyone beggin extractg for the recipe!
Why You’ll Adore This Reese’s Peanut Butter Banana Bread
The Perfect Blend of Sweet and Salty
This isn’t just a recipe; it’s an invitation to pure bliss. If you’ve ever found yourself torn between a sweet chocolate-peanut butter craving and the comforting embrace of banana bread, this creation is your answer. It harmoniously merges the best of both worlds, delivering a moist, flavorful loaf studded with delightful pockets of melted Reese’s goodness. It’s the kind of treat that transforms an ordinary afternoon into something truly special.
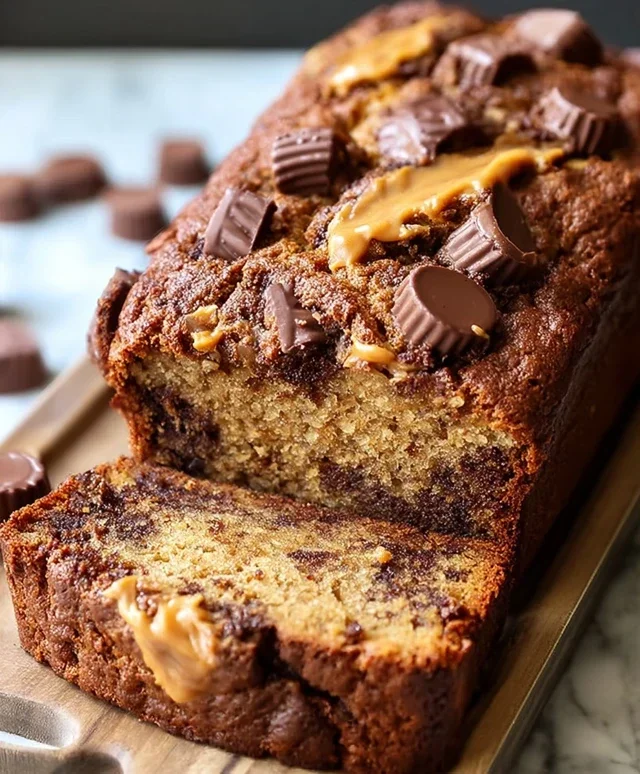
Reese’s Peanut Butter Banana Bread
Get ready to elevate your banana bread game to a whole new, utterly decadent level! This Reese’s Peanut Butter Banana Bread is not just a dessert; it’s an experience. Imagin extracte the comforting warmth of classic banana bread, infused with the irresistible salty-sweetness of peanut butter and studded with glorious chunks of Reese’s peanut butter cups. It’s the perfect treat for breakfast, a mid-afternoon pick-me-up, or a delightful dessert. The aroma alone will have your household flocking to the kitchen, and the first bite will have you hooked. This recipe is surprisingly simple to make, and the results are truly spectacular.
Ingredients:
Instructions:
Step 1: Preparing the Wet Ingredients and Preheating the Oven
The journey to peanut butter banana bread perfection begin extracts with gathering your ingredients and preheating your oven. Start by preheating your oven to 350°F (175°C). This ensures that your bread bakes evenly and develops that beautiful golden-brown crust. Next, in a large mixing bowl, we’ll combine our mashed bananas, creamy peanut butter, vegetable oil, eggs, and granulated sugar. Mash those bananas until they are smooth and lump-free. The riper the bananas, the sweeter and more flavorful your bread will be, so don’t shy away from those brown spots! Add the peanut butter, vegetable oil, eggs, and sugar to the bowl with the mashed bananas. Using a whisk or a sturdy spoon, beat these wet ingredients together until everything is well combined and the mixture is smooth and creamy. This is where the magic starts to happen, as the distinct flavors begin extract to meld.
Step 2: Combining the Dry Ingredients
In a separate medium-sized bowl, we’ll combine our dry ingredients. This step is crucial for ensuring that your leavening agents and salt are evenly distributed throughout the batter, which leads to a consistent rise and flavor. Add the all-purpose flour, baking soda, baking powder, and kosher salt to this bowl. Whisk these dry ingredients together thoroughly. Make sure there are no clumps of flour or baking soda. This simple step prevents pockets of unincorporated ingredients and ensures a wonderfully textured loaf.
Step 3: Bringin extractg it All Together
Now, it’s time to marry the wet and dry ingredients. Gradually add the dry ingredient mixture to the wet ingredient mixture. Fold them together gently using a spatula or wooden spoon. Be careful not to overmix the batter. Overmixing can develop the gluten in the flour too much, resulting in a tough and dense banana bread. You want to mix just until no dry streaks of flour remain. A few small lumps are perfectly acceptable. The goal here is a cohesive, moist batter.
Step 4: Incorporating the Reese’s Goodness
This is arguably the most exciting part: adding the Reese’s peanut butter cups! Gently fold in the 8 ounces of miniature peanut butter cups or chopped peanut butter cups into the batter. You can either toss them in a little extra flour before adding them to prevent them from sinking to the bottom during baking, or just fold them in as they are. I like to reserve a few pieces to sprinkle on top for an extra visual and flavorful appeal. Make sure they are distributed evenly throughout the batter for delicious pockets of peanut butter cup goodness in every slice.
Step 5: Baking to Golden Perfection
Pour the batter into a greased and floured 9×5 inch loaf pan. You can also line your loaf pan with parchment paper for easy removal. Smooth the top of the batter with your spatula. Now, it’s time to bake! Place the loaf pan in your preheated oven. Bake for approximately 50-65 minutes, or until a wooden skewer or toothpick inserted into the center of the loaf comes out clean, with perhaps a few moist crum extractbs attached, but no wet batter. The baking time can vary depending on your oven, so keep an eye on it. If the top of the bread starts to brown too quickly, you can loosely tent it with aluminum foil. Once baked, remove the loaf from the oven and let it cool in the pan for about 10-15 minutes. This allows the bread to set up properly before you attempt to remove it.
Step 6: Cooling and Enjoying
After the initial cooling period in the pan, carefully invert the loaf onto a wire rack to cool completely. It’s tempting to slice into it immediately, but allowing it to cool fully will give you the best texture and make for cleaner slices. Once completely cooled, slice and enjoy your masterpiece! This Reese’s Peanut Butter Banana Bread is wonderful on its own, but it’s also fantastic served warm with a smear of butter, a drizzle of extra peanut butter, or even a dollop of whipped cream. Store any leftover bread in an airtight container at room temperature for up to three days, or freeze it for longer storage. Enjoy every single, peanut-buttery bite!
Conclusion:
There you have it – a recipe that masterfully blends the irresistible charm of Reese’s peanut butter cups with the comforting sweetness of banana bread! This Reese’s Peanut Butter Banana Bread is more than just a dessert; it’s a delightful experience, perfect for satisfying those sweet cravings and impressing guests. The moist, tender crum extractb infused with ripe bananas and pockets of gooey, melted peanut butter and chocolate creates a symphony of flavors that’s truly unforgettable. It’s a fantastic way to elevate your classic banana bread game with a fun, decadent twist that everyone will adore.
I love serving slices warm, perhaps with a dollop of whipped cream or a scoop of vanilla ice cream for an extra treat. It’s also wonderful enjoyed plain with a cup of coffee or a cold glass of milk. Feel free to experiment with this recipe! You can add chocolate chips for even more chocolatey goodness, or even a swirl of extra peanut butter on top before baking. Don’t be afraid to make it your own! I wholeheartedly encourage you to give this Reese’s Peanut Butter Banana Bread a try. It’s a guaranteed crowd-pleaser and a recipe you’ll find yourself returning to again and again.
Frequently Asked Questions:
Can I use frozen bananas?
Absolutely! Frozen bananas work wonderfully in banana bread. Thaw them completely and drain off any excess liquid before mashing. They often yield an even moister bread.
What’s the best way to store leftovers?
Once cooled, store your Reese’s Peanut Butter Banana Bread in an airtight container at room temperature for up to 3 days, or in the refrigerator for up to a week. For longer storage, wrap individual slices tightly and freeze them.
Can I make this recipe vegan?
Yes, you can! Substitute the eggs with a flax egg (1 tablespoon flaxseed meal + 3 tablespoons water, let sit for 5 minutes) and use a plant-based milk instead of dairy milk. Ensure your Reese’s peanut butter cups are vegan-friendly, as some contain dairy.
Reese’s Peanut Butter Banana Bread
A delicious and decadent banana bread infused with the classic flavors of Reese’s peanut butter cups.
Ingredients
-
1 1/2 cups all purpose flour
-
1/2 teaspoon baking soda
-
1 1/2 teaspoons baking powder
-
1/2 teaspoon kosher salt
-
3 very ripe medium bananas, mashed
-
1/2 cup creamy peanut butter
-
1/4 cup vegetable oil
-
2 eggs
-
1 cup granulated sugar
-
8 ounces miniature peanut butter cups or chopped peanut butter cups
Instructions
-
Step 1
Preheat oven to 350°F (175°C). Grease and flour a 9×5 inch loaf pan. -
Step 2
In a large bowl, whisk together the flour, baking soda, baking powder, and salt. -
Step 3
In a separate bowl, mash the bananas until smooth. Stir in the creamy peanut butter, vegetable oil, eggs, and granulated sugar until well combined. -
Step 4
Add the wet ingredients to the dry ingredients and mix until just combined. Do not overmix. -
Step 5
Gently fold in the chopped peanut butter cups. -
Step 6
Pour the batter into the prepared loaf pan and bake for 50-60 minutes, or until a toothpick inserted into the center comes out clean. -
Step 7
Let the bread cool in the pan for 10 minutes before transferring to a wire rack to cool completely.
Important Information
Nutrition Facts (Per Serving)
It is important to consider this information as approximate and not to use it as definitive health advice.
Allergy Information
Please check ingredients for potential allergens and consult a health professional if in doubt.