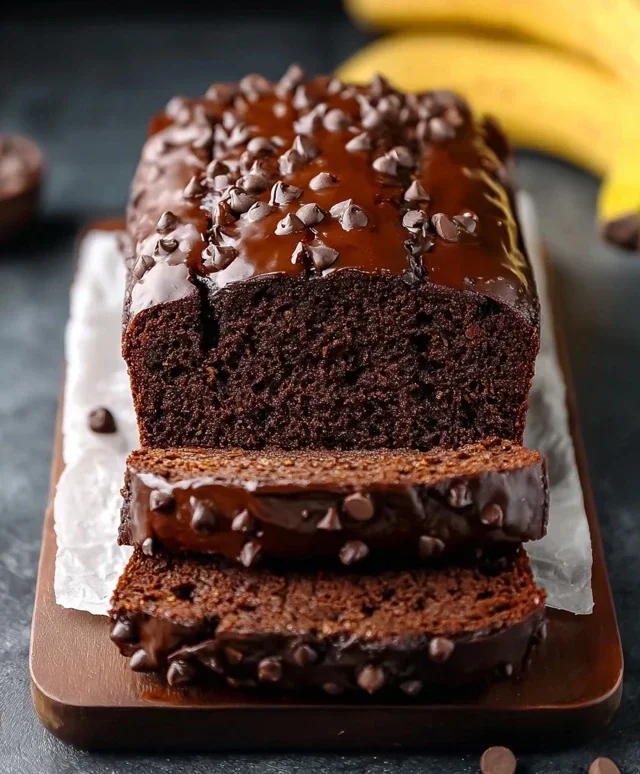
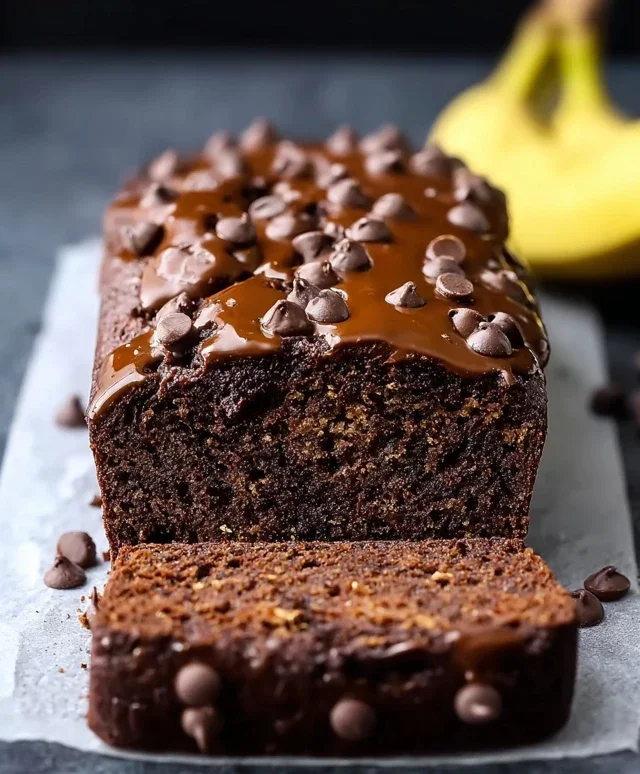
Healthy Chocolate Banana Bread-Easy & Delicious
Healthy Chocolate Banana Bread is about to become your new favorite go-to treat. Imagin extracte this: a perfectly moist, gloriously chocolatey loaf that’s actually good for you. Sound too good to be true? It’s not! We all adore banana bread for its comforting sweetness and nostalgic aroma, but what if you could indulge that craving without the guilt? That’s where this special version shines. We’ve reimagin extracted the classic, infusing it with rich cocoa and wholesome ingredients to create a dessert that’s both satisfying and nourishing. Forget dry, bland “healthy” alternatives; this Healthy Chocolate Banana Bread is bursting with flavor, making it perfect for a breakfast boost, an afternoon pick-me-up, or even a guilt-free dessert. Get ready to experience banana bread bliss, redefined.
Healthy Chocolate Banana Bread
Craving a delicious treat that’s also good for you? Look no further than this incredible Healthy Chocolate Banana Bread. It’s moist, decadent, and packed with wholesome ingredients, making it the perfect guilt-free indulgence. Forget those sugar-laden, refined-flour baked goods. This recipe focuses on natural sweetness from ripe bananas, healthy fats from nut butter, and the rich flavor of cocoa, all without compromising on taste or texture. Whether you’re looking for a healthier breakfast option, a satisfying snack, or a post-workout treat, this banana bread delivers. Plus, it’s surprisingly easy to whip up, proving that healthy eating can be absolutely delicious. The key to its success lies in using ripe, almost overripe, bananas. The riper they are, the sweeter and more moist your bread will be, allowing us to reduce the amount of added sweetener. This recipe is also wonderfully versatile, allowing for substitutions based on your dietary needs and preferences.
Ingredients:
Cooking Instructions:
Step 1: Prepare Your Wet Ingredients and Preheat Oven
The first step in creating our luscious chocolate banana bread is to get our wet ingredients ready and prepare the oven. Preheat your oven to 350°F (175°C). This consistent temperature is crucial for even baking. Next, in a large mixing bowl, begin extract by mashing your ripe bananas. The riper the bananas, the easier they will mash and the sweeter your bread will be. You want them to be smooth with only a few small lumps remaining. Once mashed, add the 2 large eggs to the bowl with the bananas. Whisk them together until well combined. Then, stir in your ¼ cup of nut butter. This adds a wonderful depth of flavor and contributes to the moistness of the bread. Make sure to choose a nut butter that you enjoy, as its flavor will be noticeable. Add the ⅓ cup of granular sweetener. If you’re using brown sugar, it will add a lovely caramel note. If you’re opting for monk fruit or another granular sweetener, ensure it’s one you’re familiar with and enjoy the taste of. Finally, add the 1 tsp of vanilla extract and the ⅙ tsp of sea salt. The vanilla enhances the sweetness and chocolate flavors, while the salt balances the sweetness and brings out the overall flavors of the bread. Whisk everything together until it’s a smooth, uniform mixture.
Step 2: Combine Your Dry Ingredients
While your wet ingredients are mingling, it’s time to bring together the dry components of our healthy banana bread. In a separate medium-sized bowl, combine the 1 ½ cups of oat flour. Oat flour is a fantastic choice for this recipe as it’s whole grain, adds a lovely texture, and is naturally gluten-free (if certified gluten-free oats are used). If you prefer, you can use another flour like all-purpose flour, whole wheat flour, or a gluten-free blend. Next, add the ½ cup of cocoa powder. Using a good quality cocoa powder will make a significant difference in the richness of the chocolate flavor. Sift the cocoa powder if it tends to be clumpy to ensure an even distribution. Now, add the 2 tsp of baking powder. Baking powder is our leavening agent, responsible for giving the bread its lift and airy texture. Make sure your baking powder is fresh for optimal results. If you are using the protein powder as a replacement for ½ cup of flour, add it to this bowl now. Ensure the protein powder you choose is suitable for baking and complements the flavors. Whisk these dry ingredients together thoroughly. This helps to distribute the leavening agent and cocoa powder evenly, preventing pockets of dryness or overly intense chocolate flavor in certain areas.
Step 3: Incorporate Dry Ingredients into Wet Ingredients
Now comes the exciting part where we combine the two mixtures! Gently pour the dry ingredients into the bowl with the wet ingredients. Using a spatula or wooden spoon, fold the dry ingredients into the wet ingredients until just combined. It’s important not to overmix at this stage. Overmixing can develop the gluten in the flour (if using wheat-based flour) too much, resulting in a tough or dense bread. You want to see just a few streaks of flour remaining. Overmixing is the enemy of tender baked goods, so err on the side of under-mixing. Once the majority of the flour streaks have disappeared, stop mixing. This is also the point where you would gently fold in the ¼ cup of chocolate chips, if you are using them in the batter. Save some for topping if you desire that extra chocolatey crunch.
Step 4: Bake the Banana Bread
Now it’s time to transform our batter into a delicious loaf. Pour the batter into a greased and floured 9×5 inch loaf pan, or a loaf pan lined with parchment paper for easy removal. If you lined your pan with parchment paper, leave some overhang on the sides to act as handles when removing the bread. Smooth the top of the batter with your spatula. If you’re adding extra chocolate chips for topping, sprinkle them evenly over the surface of the batter now. Place the loaf pan in the preheated oven on the center rack. Bake for approximately 35-45 minutes. The baking time can vary depending on your oven, so it’s essential to check for doneness. You can test if the bread is ready by inserting a toothpick or a thin knife into the center of the loaf. If it comes out clean, or with a few moist crum extractbs attached, your banana bread is done. If it comes out with wet batter, continue baking in 5-minute increments and re-testing.
Step 5: Cool and Enjoy
Once your healthy chocolate banana bread is baked to perfection, remove it from the oven. Let it cool in the loaf pan for about 10-15 minutes. This initial cooling period allows the bread to set and firm up, making it easier to handle. After this, carefully invert the loaf onto a wire rack to cool completely. Allowing it to cool completely on the wire rack is crucial for achieving the best texture. If you cut into it while it’s still warm, it might be gummy and fall apart. Once fully cooled, slice and enjoy this moist, decadent, and wholesome treat. It’s wonderful on its own, or you can spread it with a little extra nut butter or your favorite healthy topping. Store any leftovers in an airtight container at room temperature for up to 3 days, or refrigerate for longer storage. You can also freeze slices for an even longer-lasting treat.
Conclusion:
And there you have it – your guide to crafting the most delicious and guilt-free Healthy Chocolate Banana Bread! This recipe is a triumph because it masterfully balances rich, decadent chocolate flavor with the natural sweetness of ripe bananas, all while keeping things wholesome and nourishing. It’s the perfect treat for breakfast, a satisfying snack, or even a lighter dessert. Imagin extracte this warm, fragrant loaf straight from the oven – a true delight for your senses and your body. I truly hope you’ll give this recipe a try; I know you’ll love the results!
For serving, I love a thick slice with a dollop of Greek yogurt and a sprinkle of chia seeds, or simply enjoyed on its own. If you’re feeling adventurous, consider adding a handful of chopped walnuts or pecans for extra crunch, or even some dark chocolate chips for an even more intense chocolatey experience. This Healthy Chocolate Banana Bread is wonderfully versatile.
Frequently Asked Questions:
Can I make this recipe vegan?
Absolutely! To make this Healthy Chocolate Banana Bread vegan, simply substitute the eggs with a flax egg (1 tablespoon flaxseed meal mixed with 3 tablespoons water, let sit for 5 minutes) and use a plant-based milk, like almond or soy milk, instead of dairy milk. Ensure your chocolate chips are also dairy-free.
How do I store leftovers?
Store your delicious Healthy Chocolate Banana Bread in an airtight container at room temperature for up to 2-3 days, or in the refrigerator for up to a week. For longer storage, wrap individual slices tightly and freeze them. Simply thaw at room temperature when you’re ready to enjoy a slice.
My bananas aren’t very ripe. Can I still make this?
While very ripe, spotty bananas are ideal for the sweetness and moisture in this recipe, you can still use slightly less ripe ones. However, you might find the bread is less sweet and potentially a bit denser. If your bananas aren’t quite ripe enough, you can speed up the ripening process by placing them in a brown paper bag for a day or two.
Healthy Chocolate Banana Bread
A moist and delicious chocolate banana bread made with wholesome ingredients, perfect for a healthy treat.
Ingredients
-
3 medium ripe bananas (about 12 oz/360 g in total)
-
2 large eggs
-
¼ cup (60 g) nut butter (almond, peanut, cashew or sunflower seed butter)
-
⅓ cup (70 g) granular sweetener (monk fruit, or brown sugar)
-
1 tsp vanilla extract
-
⅙ tsp sea salt
-
1 ½ cup (150 g) oat flour or preferred flour
-
½ cup (50 g) cocoa powder
-
2 tsp baking powder
-
¼ cup (40 g) chocolate chips, plus extra for topping (optional)
-
½ cup (50 g) protein powder as a replacement for ½ cup (50 g) flour
Instructions
-
Step 1
Preheat oven to 350°F (175°C). Grease and flour a loaf pan or line with parchment paper. -
Step 2
In a large bowl, mash the ripe bananas until smooth. -
Step 3
Stir in the eggs, nut butter, granular sweetener, vanilla extract, and sea salt until well combined. -
Step 4
In a separate bowl, whisk together the oat flour, cocoa powder, and baking powder. If using protein powder, add it here and whisk until incorporated. -
Step 5
Gradually add the dry ingredients to the wet ingredients, mixing until just combined. Do not overmix. -
Step 6
Fold in the chocolate chips. Pour the batter into the prepared loaf pan and spread evenly. -
Step 7
If desired, sprinkle extra chocolate chips on top. -
Step 8
Bake for 35-45 minutes, or until a toothpick inserted into the center comes out clean. -
Step 9
Let the bread cool in the pan for 10 minutes before transferring to a wire rack to cool completely.
Important Information
Nutrition Facts (Per Serving)
It is important to consider this information as approximate and not to use it as definitive health advice.
Allergy Information
Please check ingredients for potential allergens and consult a health professional if in doubt.