Easy Delicious Chicken Enchiladas Recipe
Delicious Chicken Enchiladas are a true comfort food cbeef hampion, and for good reason! There’s something undeniably soul-satisfying about tender shredded chicken, bathed in a rich, flavorful enchilada sauce, all wrapped snugly in soft tortillas and topped with a generous layer of melty cheese. It’s no wonder why these delicious chicken enchiladas consistently top the charts for family dinners and crowd-pleasing gatherings. What makes this dish so special? It’s the perfect balance of savory, spicy, and cheesy goodness that dances on your palate. Each bite offers a comforting warmth and a satisfying depth of flavor that makes you want to go back for more, time and time again. Whether you’re a seasoned cook or just starting out, mastering these delicious chicken enchiladas is a culinary achievement that will have everyone asking for the recipe.
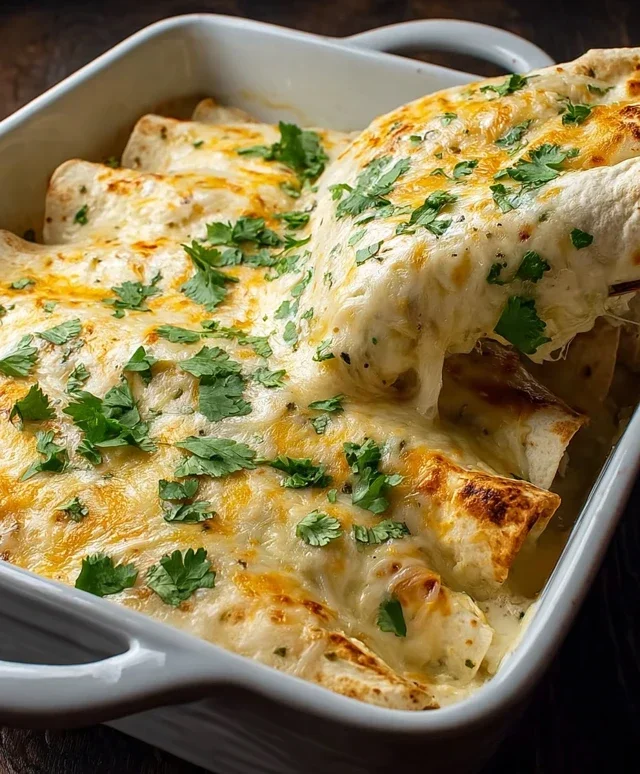
Delicious Chicken Enchiladas
There’s something incredibly comforting and satisfying about a plate of cheesy, saucy enchiladas. These delicious chicken enchiladas are a weeknight winner, bringin extractg a burst of flavor to your table without requiring a culinary degree. They’re perfect for a cozy family dinner or even for entertaining a crowd. The beauty of enchiladas lies in their simplicity and the way a few key ingredients come together to create something truly special. We’re talking tender chicken, melted cheese, and a rich, flavorful sauce all wrapped up in a soft tortilla. Let’s get started!
Ingredients:
Cooking Instructions
Now, let’s dive into the fun part – creating these delightful enchiladas!
1. Prepare the Enchilada Filling: To begin extract, we need to create a flavorful filling for our enchiladas. Heat the vegetable oil in a medium skillet over medium heat. Add the chopped onion and sauté until it becomes soft and translucent, which usually takes about 5-7 minutes. You want to coax out its natural sweetness. Once the onion is softened, add the minced garlic and cook for another minute until fragrant. Be careful not to burn the garlic, as it can turn bitter. Stir in the shredded chicken, cumin, and chili powder. Season with salt and pepper to your liking. Cook for a few minutes, stirring to combine everything evenly and allow the spices to toast slightly, which enhances their flavor. This step infuses the chicken with warmth and savory notes, forming the heart of our enchiladas.
2. Warm the Tortillas: Warm tortillas are essential for easy rolling and to prevent them from cracking. You have a few options here. You can briefly warm them in a dry skillet over medium heat for about 15-20 seconds per side, or you can wrap a stack of tortillas in a damp paper towel and microwave them for 30-60 seconds. Another method is to lightly brush them with a little vegetable oil and warm them in a skillet until pliable. The goal is to make them soft and flexible so they can be rolled without tearing. If they are too stiff, they will be difficult to work with.
3. Assemble the Enchiladas: Now for the assembly line! Preheat your oven to 375°F (190°C). Spoon about ¼ cup of the enchilada sauce into the bottom of a 9×13 inch baking dish and spread it around evenly. This creates a base layer that prevents the enchiladas from sticking and adds moisture as they bake. Take one warmed tortilla and place about ¼ cup of the chicken mixture in the center. Sprinkle a generous tablespoon or two of shredded Monterey Jack cheese over the chicken. Tightly roll up the tortilla and place it seam-side down in the prepared baking dish. Repeat this process with the remaining tortillas, chicken, and cheese, arrangin extractg them snugly in the baking dish. Don’t worry if they are packed together; this helps them hold their shape during baking.
4. Sauce and Cheese: Once all the enchiladas are rolled and nestled in the baking dish, it’s time for the luscious topping. Pour the remaining can of red enchilada sauce evenly over the rolled tortillas, making sure to cover them completely. If you like extra cheesy goodness, and who doesn’t, sprinkle the remaining shredded Monterey Jack cheese generously over the top of the sauce. You want a good, even layer of cheese that will melt into a bubbly, golden blanket. This is where the magic truly happens, transforming a collection of rolled tortillas into a decadent casserole.
5. Bake to Perfection: Cover the baking dish tightly with aluminum foil. Place the dish in the preheated oven and bake for 20-25 minutes. The foil helps to steam the tortillas and melt the cheese evenly without drying out the top. After 20-25 minutes, carefully remove the foil and continue baking for another 5-10 minutes, or until the cheese is melted, bubbly, and starting to turn a beautiful golden brown. Keep an eye on it to prevent burning. The aromas filling your kitchen at this point will be absolutely irresistible!
6. Rest and Serve: Once the enchiladas are out of the oven, let them rest for about 5-10 minutes before serving. This allows the flavors to meld together and makes them easier to plate. Serve hot, garnished with fresh chopped cilantro for a vibrant contrast and a burst of freshness. A dollop of cool, tangy sour cream on top is the perfect accompaniment, adding a creamy finish that complements the rich enchilada sauce beautifully. Enjoy every delicious bite of your homemade chicken enchiladas!

Conclusion:
There you have it – a straightforward guide to crafting absolutely delicious chicken enchiladas that are sure to become a family favorite! This recipe is a winner because it balances comforting, familiar flavors with an ease of preparation that makes it perfect for weeknights or casual entertaining. The tender shredded chicken, smothered in a rich, savory sauce, and topped with gooey cheese, creates a truly satisfying meal. I hope you feel inspired to bring this fantastic dish to your own table. Serve them with your favorite sides like Mexican rice, refried beans, or a fresh green salad for a complete and vibrant feast. Don’t be afraid to experiment with variations; try different cheeses, add a spoonful of corn to the filling, or even swap the chicken for seasoned ground beef or black beans for a vegetarian option.
I truly encourage you to give these delicious chicken enchiladas a try. They are a testament to how simple ingredients can come together to create something incredibly special and memorable. Let me know how yours turn out!
Frequently Asked Questions:
Can I make the enchilada sauce from scratch?
Absolutely! While store-bought sauce is convenient, making your own enchilada sauce allows for more control over flavor. You can simmer tomatoes, chili powder, cumin, garlic, and onion to create a wonderfully authentic sauce. This recipe is designed to be adaptable, so feel free to use your favorite homemade version.
What are some good make-ahead tips for chicken enchiladas?
Yes! You can prepare the chicken filling and the sauce a day in advance. You can even assemble the enchiladas (without baking) and cover them tightly with plastic wrap and then foil. Store them in the refrigerator and bake when ready to serve. You might need to add a few extra minutes to the baking time if they are coming straight from the fridge.
Can I freeze leftover chicken enchiladas?
Definitely! Once cooled, wrap individual portions or the entire pan tightly in plastic wrap, then in aluminum foil. They can be frozen for up to 2-3 months. To reheat, thaw overnight in the refrigerator and bake at 350°F (175°C) until heated through, or bake directly from frozen, adding extra baking time as needed.
Delicious Chicken Enchiladas
Flavorful and satisfying chicken enchiladas with a cheesy, zesty filling, perfect for a weeknight meal or entertaining.
Ingredients
-
2 cups Cooked and shredded chicken
-
1 can Red enchilada sauce (10 oz)
-
2 cups Shredded Monterey Jack cheese
-
8 pieces Flour tortillas
-
1 tablespoon Vegetable oil
-
1 small Onion, chopped
-
2 cloves Garlic, minced
-
1 teaspoon Cumin
-
1 teaspoon Chili powder
-
Salt, to taste
-
Pepper, to taste
-
Chopped cilantro, for garnish
-
Sour cream, for serving
Instructions
-
Step 1
Preheat oven to 375°F (190°C). Lightly grease a 9×13 inch baking dish. -
Step 2
In a large skillet, heat vegetable oil over medium heat. Add chopped onion and cook until softened, about 5 minutes. Add minced garlic and cook for 1 minute more until fragrant. -
Step 3
Stir in the shredded chicken, cumin, chili powder, salt, and pepper. Cook for 2-3 minutes to combine flavors. -
Step 4
Warm the flour tortillas slightly to make them pliable. Spread about 1/4 cup of the chicken mixture down the center of each tortilla, sprinkle with some shredded cheese, and roll up tightly. Place seam-side down in the prepared baking dish. -
Step 5
Pour the enchilada sauce evenly over the rolled enchiladas. Sprinkle the remaining shredded cheese over the top. -
Step 6
Bake for 20-25 minutes, or until the cheese is melted and bubbly and the enchiladas are heated through. -
Step 7
Garnish with chopped cilantro and serve immediately with a dollop of sour cream.
Important Information
Nutrition Facts (Per Serving)
It is important to consider this information as approximate and not to use it as definitive health advice.
Allergy Information
Please check ingredients for potential allergens and consult a health professional if in doubt.