Easy Buster Bar Ice Cream Dessert Recipe
Buster Bar Ice Cream Dessert. Oh, where do I even begin extract with this absolute classic? If you’ve ever experienced the pure joy of a frosty, chocolate-covered, nutty indulgence, then you already know the magic I’m talking about. This isn’t just any dessert; it’s a trip down memory lane for so many of us, a guaranteed crowd-pleaser, and frankly, my go-to when I need a serious sweet treat. What makes the Buster Bar Ice Cream Dessert so incredibly special? It’s the perfect symphony of textures and flavors: creamy ice cream, a crisp chocolate shell, and that satisfying crunch from the peanuts. It’s that nostalgic bliss, that delightful contrast, and the sheer, unadulterated fun of eating it, all rolled into one irresistible package. Prepare to be delighted!
Why You’ll Love This Recipe
Get ready to recreate a beloved favorite right in your own kitchen!
Buster Bar Ice Cream Dessert
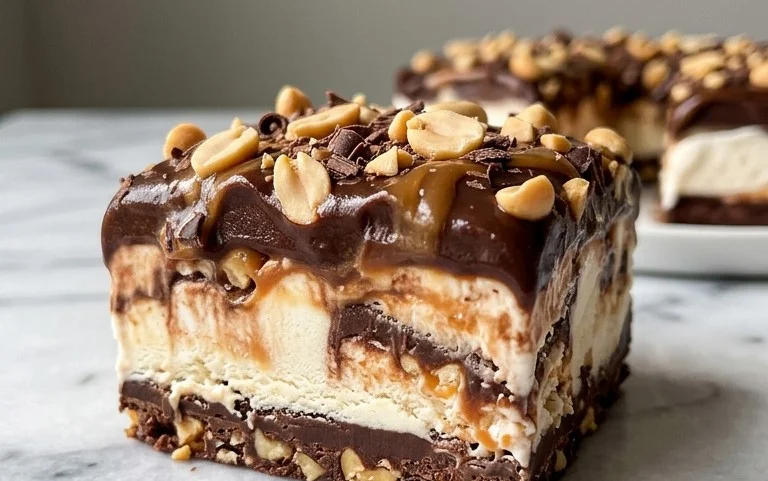
This Buster Bar Ice Cream Dessert is a nostalgic trip back to those classic ice cream truck treats, but elevated to an impressive homemade masterpiece. It’s the perfect dessert for a summer gathering, a birthday celebration, or just when that craving for something wonderfully sweet and chocolatey strikes. Imagin extracte a rich, creamy vanilla ice cream base layered with a crunchy, chocolatey, and peanut-filled crust, all enrobed in a decadent chocolate shell. It’s a multi-textural delight that will have everyone asking for the recipe. The beauty of this dessert is that it looks and tastes incredibly gourmet, but it’s surprisingly straightforward to assemble. So, grab your apron and let’s get ready to create some magic!
Ingredients:
Preparing the Base and Crust
The foundation of our Buster Bar Ice Cream Dessert is a delightful combination of crushed Oreos and melted butter. This creates a wonderfully crisp and chocolatey crust that mimics the cookie coating of its ice cream truck inspiration. To start, take your entire package of Oreo cookies and crush them. You can do this by placing them in a zip-top bag and using a rolling pin, or by pulsing them in a food processor until they are fine crum extractbs. It’s important to get them quite fine for the best texture. Once crushed, pour these delicious crum extractbs into a medium-sized bowl. Next, melt your 1/2 cup of butter. You can do this in a microwave-safe bowl in 30-second intervals, stirring in between, or gently melt it on the stovetop in a small saucepan. Pour the melted butter over the Oreo crum extractbs and stir thoroughly until all the crum extractbs are moistened and clump together. This mixture will resemble wet sand.
Now, let’s get this crust ready for its ice cream embrace. Take a 9×13 inch baking dish (or a similar-sized rectangular dish). I like to line mine with parchment paper, leaving some overhang on the sides. This makes it incredibly easy to lift the entire dessert out of the pan once it’s frozen, which is a lifesaver when you’re ready to slice and serve. Press about half of the Oreo crum extractb mixture evenly into the bottom of your prepared baking dish. You want a firm, compact layer. Use the bottom of a glass or a measuring cup to really pack it down. This will be the base for our ice cream. Reserve the remaining Oreo crum extractb mixture for later.
Assembling the Ice Cream Layers
It’s time to introduce the star of the show: the vanilla ice cream! Make sure your 1/2 gallon of vanilla ice cream has been softened. This means taking it out of the freezer about 15-20 minutes before you plan to use it. You want it scoopable and spreadable, but not completely melted and soupy. If it’s too hard, you’ll struggle to spread it evenly, and if it’s too soft, it will melt into your crust too quickly. Carefully spoon the softened vanilla ice cream over the pressed Oreo crust. Use an offset spatula or the back of a spoon to spread the ice cream into an even layer, right to the edges of the pan. Try to get it as smooth as possible.
Now, for the second layer of crunchy goodness! Take your reserved Oreo crum extractb mixture and sprinkle it evenly over the top of the vanilla ice cream layer. Gently press this second layer of crum extractbs down into the ice cream so it adheres well. This creates those delightful pockets of crunch that are characteristic of a Buster Bar. At this point, you’ll want to pop your assembled dessert into the freezer. We need it to firm up significantly before we can move on to the magical chocolate coating. Let it freeze for at least 2-3 hours, or until it’s quite solid. The firmer it is, the easier the next steps will be.
Crafting the Peanut Topping
While the ice cream is firming up, let’s prepare the incredible peanut topping that makes this dessert truly special. Take your 1 pound of Spanish peanuts. These are typically smaller and have a lovely sweet flavor that complements the chocolate and ice cream perfectly. You can leave them whole, or if you prefer smaller pieces, you can roughly chop them. Set these aside.
Next, we’ll create a luscious caramel-like mixture. In a medium saucepan, combine 1/2 cup of butter and 12 ounces of evaporated milk. Place this over medium heat and stir constantly until the butter is completely melted and the mixture is well combined. Once melted, gradually whisk in 2 cups of powdered confectioner’s sugar. Continue to stir over medium heat until the sugar is fully dissolved and the mixture is smooth and slightly thickened. This will create a delicious, sweet, and slightly caramel-flavored sauce.
Remove the saucepan from the heat. Now, stir in the Spanish peanuts. Make sure they are thoroughly coated in the sweet mixture. This peanut topping is going to be spread over the frozen ice cream, adding a fantastic textural contrast and a burst of nutty flavor.
The Final Flourish: Chocolate Coating
This is where the magic truly happens! Once your ice cream base is thoroughly frozen and firm, it’s time to add the final layer of decadence. Carefully retrieve your baking dish from the freezer. Evenly spoon and spread the peanut mixture over the top of the frozen ice cream layer. Gently press it down so it adheres to the ice cream and creates a lovely, textured topping. You want this layer to be relatively even across the entire surface. Return the dish to the freezer for at least another hour, or until the peanut layer is firm to the touch.
Now for the grand finnon-alcoholic ale: the chocolate coating! In a microwave-safe bowl, combine 12 ounces of semi-sweet chocolate chips and the remaining 1/2 cup of butter. Microwave these in 30-second intervals, stirring well after each interval, until the chocolate is completely melted and smooth. Stir until it’s glossy and luxurious. You can also melt this in a double boiler on the stovetop if you prefer.
Once your chocolate is melted and smooth, and your peanut topping is firm, it’s time to pour the chocolate over the top. Quickly and evenly pour the melted chocolate over the entire peanut layer. Use an offset spatula or the back of a spoon to spread the chocolate into a smooth, even coating, ensuring all the peanuts are covered. Work quickly, as the cold ice cream will start to set the chocolate almost immediately.
Serving Your Masterpiece
As soon as the chocolate is spread, immediately place the dessert back into the freezer for at least another 2-3 hours, or until the chocolate coating is completely firm. This step is crucial for achieving those clean, crisp edges when you cut into it. Once it’s fully frozen and the chocolate is hard, you’re ready to serve!
To serve, use a sharp knife dipped in hot water and dried for clean slices. Cut the dessert into bars, just like the classic Buster Bar. The combination of the chocolate cookie crust, the creamy vanilla ice cream, the sweet peanut topping, and the crisp chocolate shell is an absolute triumph. Enjoy every delicious, nostalgic bite! This Buster Bar Ice Cream Dessert is sure to become a family favorite.
Conclusion:
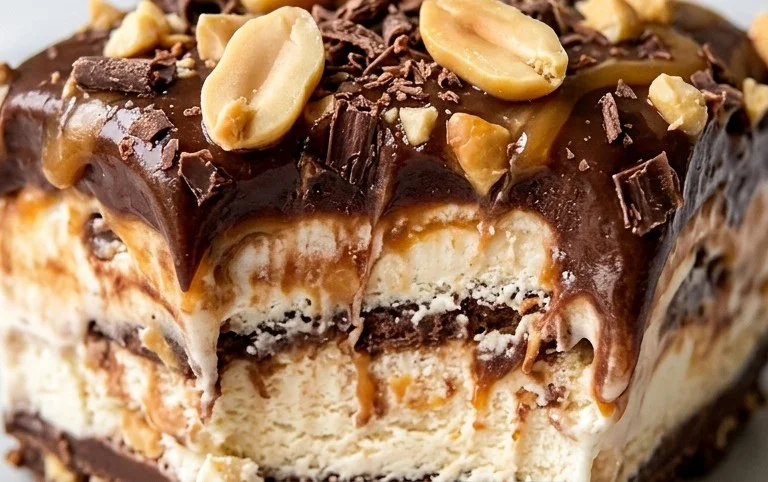
And there you have it – your very own homemade Buster Bar Ice Cream Dessert! I’m so excited for you to try this recipe because it’s truly spectacular. It captures that beloved chocolate-caramel-peanut butter flavor combination we all know and love from the classic treat, but with the added bonus of being made right in your own kitchen. The creamy ice cream, the rich chocolate coating, and the irresistible crunch of peanuts and caramel create a dessert that’s both nostalgic and refreshingly new. It’s perfect for cooling down on a hot day, celebrating a special occasion, or simply satisfying that sweet craving.
For serving, I love to cut this into generous bars and enjoy them straight from the freezer. They also look absolutely stunning arranged on a platter for a party. Don’t be afraid to get creative with variations! You could try adding a swirl of raspberry jam before freezing for a fruity twist, or perhaps sprinkle some toffee bits over the chocolate coating for extra texture. The possibilities are endless! I genuinely encourage you to give this Buster Bar Ice Cream Dessert a go. It’s incredibly rewarding to create such a delicious treat from scratch, and I’m confident you’ll be thrilled with the results.
Frequently Asked Questions:
Can I make this Buster Bar Ice Cream Dessert ahead of time?
Absolutely! This dessert is perfect for making ahead. In fact, it needs ample time to freeze properly. Once it’s fully set, you can store it in the freezer, tightly wrapped, for up to two weeks. Just be sure to let it sit at room temperature for a few minutes before cutting into it for the easiest slicing.
What kind of chocolate is best for the coating?
For the best flavor and texture, I recommend using a good quality semi-sweet or dark chocolate for the coating. You can also use chocolate chips that are specifically designed for melting, as they tend to have a smoother finish. Experiment with milk chocolate if you prefer a sweeter coating!
Buster Bar Ice Cream Dessert
A no-bake ice cream dessert layered with crushed Oreos, peanuts, and a chocolatey fudge.
Ingredients
-
1 14.3 oz pkg. of Oreo cookies, (crushed)
-
1/2 C butter, (melted)
-
1/2 gal. vanilla ice cream, (softened)
-
1 lb. Spanish peanuts
-
2 C powdered confectioner’s sugar
-
12 oz semi sweet chocolate chips
-
1/2 C butter
-
12 oz evaporated milk
Instructions
-
Step 1
Mix crushed Oreo cookies with 1/2 cup melted butter. Press into the bottom of a 9×13 inch pan. -
Step 2
Spread softened vanilla ice cream evenly over the cookie crust. -
Step 3
Sprinkle the Spanish peanuts evenly over the ice cream layer. -
Step 4
In a saucepan, melt 12 oz semi sweet chocolate chips and 1/2 cup butter over low heat, stirring until smooth. Gradually whisk in the 12 oz evaporated milk until well combined and smooth. -
Step 5
Stir in 2 cups powdered confectioner’s sugar into the chocolate mixture until smooth. Pour the chocolate fudge mixture over the peanut layer. -
Step 6
Freeze for at least 4-6 hours, or until firm. Cut into squares and serve.
Important Information
Nutrition Facts (Per Serving)
It is important to consider this information as approximate and not to use it as definitive health advice.
Allergy Information
Please check ingredients for potential allergens and consult a health professional if in doubt.