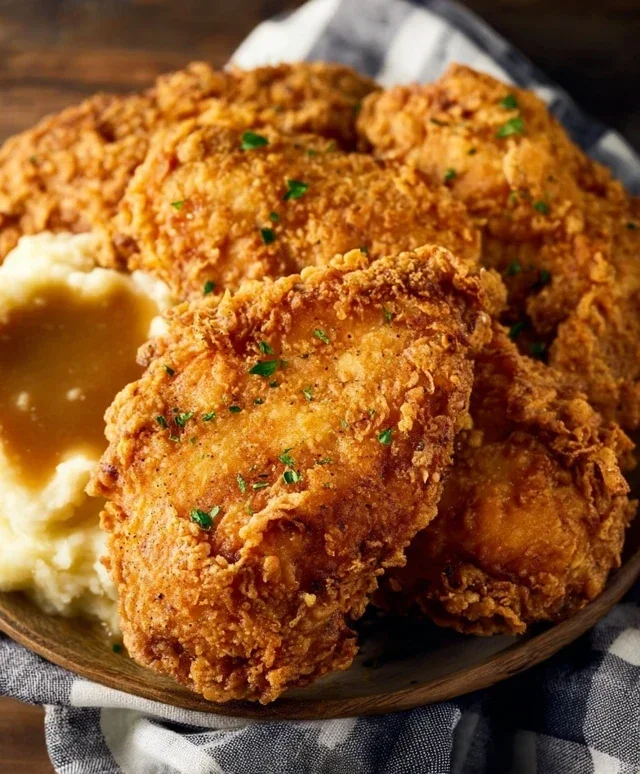
Country Fried Chicken- Crispy Juicy & Flavorful
Country fried chicken is more than just a meal; it’s a hug on a plate, a taste of home that transports us back to simpler times. Who can resist that perfect symphony of crunchy, golden-brown crust giving way to impossibly tender, juicy chicken? It’s a dish that ignites comfort and joy, bringin extractg families together around the dinner table with its irresistible aroma and soul-satisfying flavor. There’s a magic in the simplicity of country fried chicken – the way humble ingredients transform into something truly extraordinary. We all have our memories tied to this iconic dish, whether it’s from Grandma’s kitchen or a cherished diner. This recipe aims to capture that authentic, deeply satisfying essence, promising you a batch of country fried chicken that will become a staple in your own culinary repertoire.
Country Fried Chicken
There’s something undeniably comforting about a plate piled high with crispy, golden country fried chicken. It’s a classic for a reason – that perfect crunch on the outside giving way to juicy, tender chicken on the inside is pure culinary bliss. Forget those dry, bland versions; this recipe is designed to deliver maximum flavor and a texture that will have everyone asking for seconds. We’re going to take our time, layering flavors and ensuring each piece is cooked to perfection. This isn’t just about frying chicken; it’s about creating a memorable meal.
Ingredients:
Getting Started: Preparing the Chicken
First things first, let’s get our chicken ready. We’re using boneless, skinless chicken breasts, which are convenient and cook relatively quickly. To ensure even cooking and a more manageable size for frying, I like to cut each chicken breast in half horizontally, creating thinner cutlets. This also allows for more surface area to get that coveted crispy coating. If your breasts are particularly thick, you might even consider cutting them into thirds. The goal is to have pieces that are roughly uniform in thickness. Once cut, place the chicken pieces in a shallow dish or a large resealable plastic bag.
The Buttermilk Bath: Infusing Flavor and Tenderness
Now for the secret to incredibly tender and flavorful chicken: the buttermilk marinade. Pour the 2 cups of buttermilk over the prepared chicken pieces, making sure each piece is fully submerged. The acidity in the buttermilk works wonders to break down the chicken’s proteins, resulting in a remarkably tender texture. It also helps the breading adhere beautifully. Season this bath generously with 1 teaspoon of the salt, ½ teaspoon of the black pepper, and the ½ teaspoon of cayenne pepper. Give everything a gentle mix to distribute the seasonings. Cover the dish or seal the bag and let it marinate in the refrigerator for at least 30 minutes, but for best results, aim for 2 to 4 hours. You can even marinate it overnight for an extra boost of flavor.
Creating the Crispy Coating: The Flour and Breadcrum extractb Mixture
While the chicken is doing its thing in the buttermilk bath, we’ll prepare our dredgin extractg station. In a shallow dish or a pie plate, combine the 1 ½ cups of all-purpose flour, ½ cup of breadcrum extractbs, the remaining 2 teaspoons of salt, 2 ½ teaspoons of seasoned salt, ¾ teaspoon of paprika, and the remaining 1 teaspoon of black pepper. Whisk these dry ingredients together thoroughly. You want to ensure all the spices and seasonings are evenly distributed throughout the flour and breadcrum extractbs. This mixture is the foundation of our crispy crust, so don’t skip the thorough mixing!
In a separate shallow dish, whisk together the 2 large eggs with a splash of water or milk (about a tablespoon). This egg wash will help the dry coating stick to the chicken.
The Dredgin extractg Process: Building Layers of Crunch
Once the chicken has finished its marination, it’s time to get our hands a little messy with the dredgin extractg. Remove one piece of chicken from the buttermilk, letting any excess drip off. First, place the chicken into the flour mixture, pressing down gently to coat all sides. You want a good, even layer of flour. Then, dip the floured chicken back into the whisked eggs, allowing any excess to drip off. Finally, return the chicken to the flour mixture for a second time, pressing again to ensure a thick, even coating of the flour and breadcrum extractb mixture. This double-dredgin extractg technique is key to achieving that extra-crispy, craggy crust we all love. Place the coated chicken pieces on a wire rack set over a baking sheet. Repeat this process for all the chicken pieces. Letting the coated chicken rest on the rack for about 10-15 minutes before frying allows the coating to adhere even better, further preventing it from falling off during cooking.
Frying to Golden Perfection: Achieving That Perfect Crisp
Now for the exciting part: frying! Heat the 1 ½ cups of vegetable oil in a large, heavy-bottomed skillet (cast iron is ideal for even heat distribution) over medium-high heat. You’re looking for the oil to reach a temperature of about 350°F (175°C). If you don’t have a thermometer, you can test the oil by dropping a tiny bit of the flour mixture into it; it should sizzle immediately and float to the surface. Carefully place 2-3 pieces of chicken into the hot oil, being careful not to overcrowd the pan. Overcrowding will lower the oil temperature too much, resulting in greasy, soggy chicken.
Fry the chicken for about 5-7 minutes per side, or until it’s a deep golden brown and cooked through. The internal temperature should reach 165°F (74°C) when tested with an instant-read thermometer inserted into the thickest part of the chicken without touching bone. Use tongs to carefully turn the chicken pieces to ensure even browning on all sides. Once cooked, remove the chicken from the skillet and place it on a clean wire rack set over a baking sheet to drain any excess oil and keep it crispy. You can place the cooked chicken in a warm oven (around 200°F/95°C) while you fry the remaining batches to keep it warm.
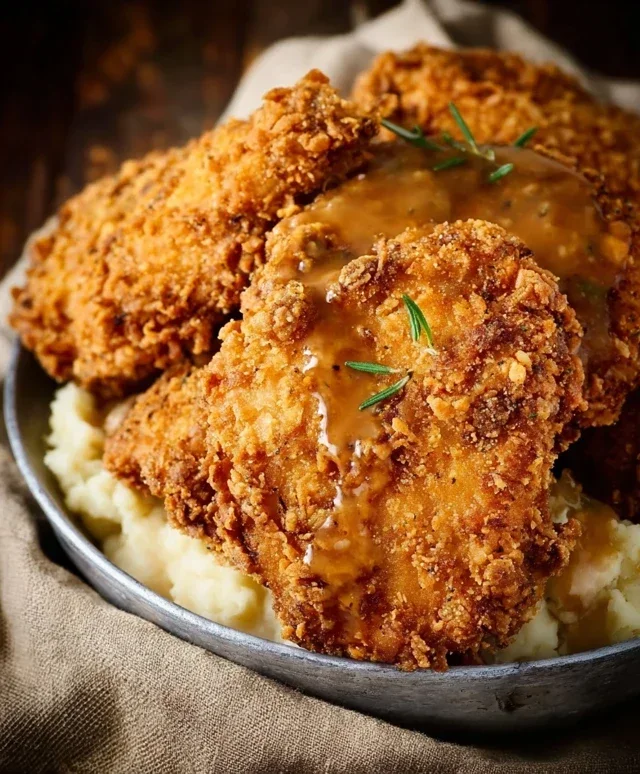
Serving Your Masterpiece
And there you have it – your homemade, incredibly delicious country fried chicken! The aroma alone is enough to make your mouth water. Serve it hot, alongside your favorite classic sides like mashed potatoes, gravy, coleslaw, or biscuits. Enjoy the satisfying crunch and the juicy, tender chicken that you’ve created. This is a recipe that’s sure to become a family favorite.
Conclusion:
And there you have it! Your guide to creating truly spectacular country fried chicken right in your own kitchen. This recipe is a winner because it balances a perfectly crispy, seasoned crust with incredibly juicy, tender chicken. It’s a taste of home, a comfort food classic that’s surprisingly achievable. Don’t be intimidated by the frying process; with a few key tips, you’ll be a pro in no time. Serve it up with all your favorite fixings – creamy mashed potatoes, collard greens, cornbread, or a crisp coleslaw – and you’ve got a meal fit for any occasion, from a weeknight dinner to a Sunday feast.
Feeling adventurous? You can easily put your own spin on this recipe. Try adding a pinch of cayenne pepper to your flour dredge for a subtle kick, or incorporate smoked paprika for a deeper flavor. Some people love to add a touch of garlic powder or onion powder to the seasoned flour for an extra layer of savory goodness. The most important thing is to have fun and experiment! I encourage you to give this country fried chicken a try; the results will undoubtedly impress you and your loved ones. It’s a rewarding cooking experience with a delicious payoff.
Frequently Asked Questions:
Can I bake this country fried chicken instead of frying it?
While baking won’t yield the exact same crispy, golden-brown crust as traditional frying, you can achieve a satisfying result. After dredgin extractg, place the chicken on a wire rack set inside a baking sheet. Bake in a preheated oven at 400°F (200°C) for about 30-40 minutes, flipping halfway through, until cooked through and golden. For a crispier bake, you can spray the chicken with cooking spray before baking.
What kind of oil is best for frying?
For authentic country fried chicken, a neutral-flavored oil with a high smoke point is ideal. Vegetable oil, canola oil, or peanut oil are excellent choices. These oils can handle the high temperatures needed for frying without burning and imparting unwanted flavors to your chicken.
Country Fried Chicken
Classic Southern-style country fried chicken, featuring tender chicken breasts coated in a seasoned flour and breadcrumb mixture and fried to golden perfection.
Ingredients
-
4 boneless skinless chicken breasts
-
2 cups buttermilk
-
2 large eggs (whisked)
-
1 ½ cup all-purpose flour
-
½ cup breadcrumbs
-
2 ½ teaspoons seasoned salt
-
¾ teaspoon paprika
-
½ teaspoon cayenne pepper
-
1 ½ teaspoon black pepper
-
3 teaspoons salt
-
1 ½ cups vegetable oil
Instructions
-
Step 1
Prepare the chicken by pounding the boneless skinless chicken breasts to an even thickness. -
Step 2
In a shallow dish, whisk together the buttermilk and whisked eggs. Season with 3 teaspoons of salt. -
Step 3
In a separate shallow dish, combine the all-purpose flour, breadcrumbs, 2 ½ teaspoons seasoned salt, ¾ teaspoon paprika, ½ teaspoon cayenne pepper, and 1 ½ teaspoon black pepper. -
Step 4
Dip each chicken breast into the buttermilk and egg mixture, allowing excess to drip off. Then, dredge thoroughly in the flour and breadcrumb mixture, ensuring it is fully coated. -
Step 5
Heat 1 ½ cups of vegetable oil in a large, heavy skillet over medium-high heat until shimmering. Carefully place the coated chicken breasts into the hot oil, being careful not to overcrowd the pan. -
Step 6
Fry the chicken for approximately 5-7 minutes per side, or until golden brown and cooked through. Adjust heat as needed to prevent burning. -
Step 7
Remove the fried chicken from the skillet and drain on a wire rack set over paper towels. Serve hot.
Important Information
Nutrition Facts (Per Serving)
It is important to consider this information as approximate and not to use it as definitive health advice.
Allergy Information
Please check ingredients for potential allergens and consult a health professional if in doubt.