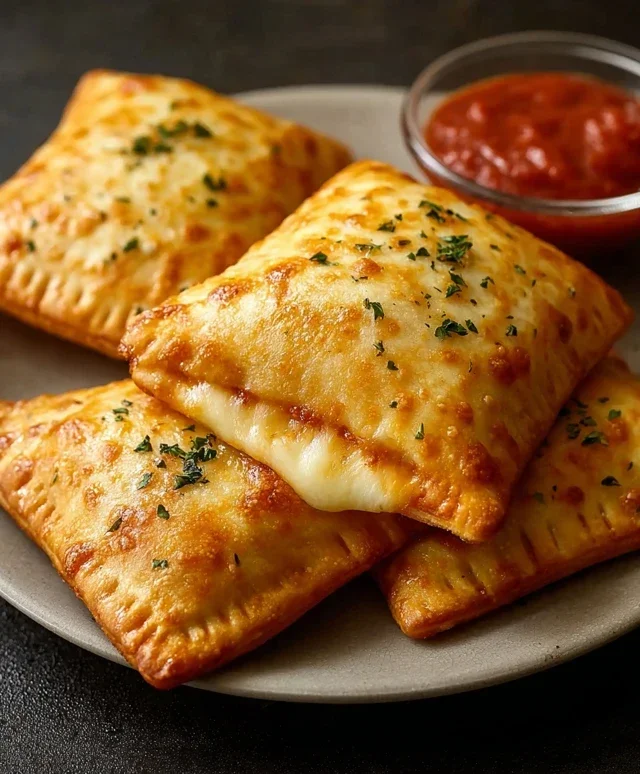
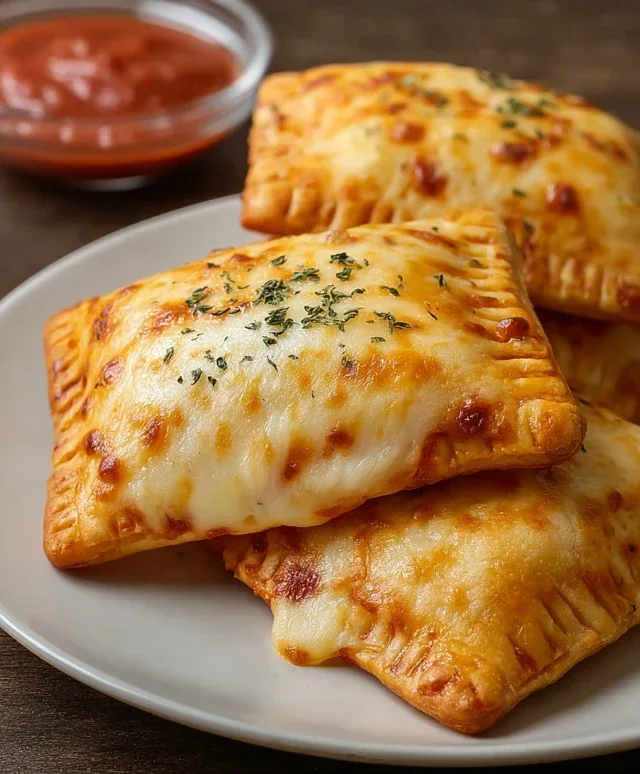
Cheesy Pizza Pockets Recipe-Quick & Delicious Bites
Cheesy Pizza Pockets are more than just a nostalgic snack; they’re a portable burst of pure joy. We all remember those delightful little parcels of pizza goodness, and today, we’re diving deep into how to recreate that magic in your own kitchen, making them even more irresistible than you can imagin extracte. What is it about these handheld wonders that captures our hearts? It’s that perfect alchemy of warm, pillowy dough giving way to a molten, gooey interior of savory tomato sauce, your favorite pizza toppings, and, of course, an abundance of glorious, stretchy cheese. They’re the ultimate convenience food, but elevated. Forget the freezer aisle; these homemade Cheesy Pizza Pockets will redefine your expectations, offering a customizable, incredibly satisfying experience that’s perfect for quick lunches, after-school treats, or even a fun family activity. Get ready to fall in love all over again with these amazing Cheesy Pizza Pockets!
Cheesy Pizza Pockets
Who doesn’t love pizza? The warm, gooey cheese, the savory sauce, the satisfying crust – it’s a crowd-pleaser for a reason. But sometimes, a full-blown pizza feels like a bit too much effort for a quick craving, or maybe you’re looking for a fun, portable snack. That’s where these Cheesy Pizza Pockets come in! They’re like little parcels of pure pizza happiness, perfectly portioned and incredibly easy to make. Imagin extracte biting into a golden-brown, slightly crisp pocket filled with all your favorite pizza flavors. It’s a weeknight dinner lifesaver, a fantastic lunchbox addition, or the ultimate party appetizer. They’re incredibly versatile, too, so you can customize them to your heart’s content.
Ingredients:
Getting Started: Preparing Your Pockets
The beauty of these pizza pockets lies in their simplicity, starting with the dough. Whether you choose a can of refrigerated pizza dough or crescent rolls, the key is to work with it while it’s cold. This makes it much easier to handle and prevents it from becoming sticky and difficult to shape. If you’re using pizza dough, I find it helpful to lightly flour my work surface and a rolling pin to prevent any sticking. You’ll want to roll it out to about a quarter-inch thickness. For crescent rolls, each triangle will become its own little pocket, so you might just need to stretch them out slightly if they seem a bit small.
Now, let’s talk about those delicious fillings. The marinara sauce forms the flavorful base, so make sure it’s a good quality one you enjoy. The shredded mozzarella is essential for that irresistible cheesy pull we all crave. For the toppings, I’ve listed beef pepperoni as a classic, but don’t be afraid to experiment! Finely diced mushrooms sautéed beforehand, crum extractbled cooked Italian sausage, or colorful bell peppers all add wonderful textures and flavors. Just remember to dice any vegetables or cook any meats finely so they fit comfortably inside the pockets and cook through evenly. A quarter teaspoon of Italian herbs, like oregano, basil, and thyme, will infuse your pockets with that authentic pizza aroma. And a light sprinkle of powdered garlic adds a subtle savory kick without being overpowering.
Assembling and Baking Your Pizza Pockets
This is where the magic happens! Once your dough is prepared and your fillings are ready, it’s time to bring it all together. If you’re using pizza dough, cut it into roughly equal squares or rectangles, depending on how you want to shape your pockets. For crescent rolls, you’ll use each triangle as is.
1. Layering the Flavor: On one half of each dough piece (or one side of each crescent roll triangle), spoon a generous but not overwhelming amount of marinara sauce. Be careful not to overfill, as this can lead to leaks during baking and a messy pocket. Leave a small border around the edges to ensure a good seal.
2. Cheese and Toppings: Sprinkle a good layer of shredded mozzarella cheese over the marinara sauce. This is your cheese foundation! Then, evenly distribute your chosen toppings over the cheese. If you’re using something like diced peppers or mushrooms, make sure they are spread out and not clumped together. Don’t go overboard with the toppings; remember you need to seal them in!
3. The Herb and Garlic Infusion: Now, for that extra burst of flavor. Sprinkle your Italian herbs and the light dusting of powdered garlic over the toppings. This ensures those aromatic notes are evenly distributed within each pocket.
4. Sealing the Deal: This is a crucial step for creating those perfect little pockets. Take the other half of your dough (or the other side of your crescent roll triangle) and carefully fold it over the filling, creating a pocket shape. Press the edges firmly together to seal. You can use your fingers, or for a more decorative and secure seal, use the tines of a fork to crimp the edges all around. This not only looks nice but also helps prevent any of the delicious filling from escaping during baking. Ensure there are no gaps!
5. The Golden Finish: Place your senon-alcoholic aled pizza pockets onto a baking sheet lined with parchment paper. This prevents sticking and makes for easy cleanup. Now, for that beautiful golden-brown crust. Using a pastry brush, lightly brush the tops of each pocket with melted butter or olive oil. This will give them a lovely sheen and help them crisp up nicely in the oven. For an extra touch of savory goodness, sprinkle a little grated Parmesan cheese over the brushed tops. This melts into a delightful cheesy crust.
Baking to Perfection
Preheat your oven to the temperature recommended on your pizza dough or crescent roll packagin extractg, typically around 375-400°F (190-200°C). Bake for about 12-18 minutes, or until the pockets are puffed up, golden brown, and the cheese is melted and bubbly. Keep an eye on them as ovens can vary, and you want them perfectly cooked, not burnt. Once they’re out of the oven, let them cool for just a few minutes before enjoying. They’ll be very hot inside! These Cheesy Pizza Pockets are truly a delightful way to enjoy all the flavors of pizza in a fun, portable, and incredibly satisfying package. Enjoy every cheesy bite!
Conclusion:
I hope you’re as excited as I am to try these incredibly simple yet utterly delicious cheesy pizza pockets! They’re a fantastic recipe because they deliver all the comforting, savory goodness of pizza in a perfectly portioned, handheld format. Whether you’re a begin extractner in the kitchen or a seasoned pro, this recipe is designed for success, requiring minimal effort for maximum flavor. These cheesy pizza pockets are perfect for busy weeknights, satisfying lunches, or even as a fun appetizer for gatherings. Imagin extracte the ooey-gooey cheese pull combined with your favorite pizza toppings – it’s pure joy in every bite!
For serving, I love to pair them with a fresh garden salad for a balanced meal, or even just a side of marinara sauce for extra dipping delight. Don’t be afraid to get creative with your fillings! Consider adding cooked crum extractbled sausage, sautéed mushrooms, diced bell peppers, or even a sprinkle of red pepper flakes for a little heat. The possibilities are truly endless when it comes to customizing your perfect cheesy pizza pocket.
Give this recipe a go – I promise you won’t be disappointed. They’re a crowd-pleaser and a personal favorite for a reason!
Frequently Asked Questions about Cheesy Pizza Pockets:
Can I make these ahead of time?
Absolutely! You can assemble the cheesy pizza pockets and refrigerate them before baking. When you’re ready to cook, simply add a few extra minutes to the baking time to ensure they’re heated through and golden brown. This makes them an even more convenient option for meal prep!
What kind of dough should I use?
While this recipe often uses store-bought refrigerated pizza dough for ultimate convenience, you can certainly use your favorite homemade pizza dough recipe if you prefer. Just ensure it’s been proofed and is ready to be rolled out. Pre-made crescent roll dough can also work for a quicker, flakier variation.
How can I make them healthier?
To make these cheesy pizza pockets a bit healthier, you can opt for whole wheat pizza dough. Load them up with plenty of vegetables like spinach, mushrooms, and onions, and go lighter on the cheese or use a reduced-fat mozzarella. You can also choose lean protein sources like grilled chicken breast or turkey beef pepperoni.
Cheesy Pizza Pockets
Quick and easy cheesy pizza pockets filled with your favorite toppings, perfect for a snack or light meal.
Ingredients
-
1/2 cup marinara sauce
-
1 cup mozzarella cheese, shredded
-
1 can refrigerated pizza dough
-
1/2 cup beef pepperoni
-
A quarter teaspoon of Italian herbs
-
A light sprinkle of powdered garlic
-
Melted butter
-
Grated Parmesan for finishing
Instructions
-
Step 1
Preheat your oven to 400°F (200°C). Lightly grease a baking sheet. -
Step 2
Unroll the pizza dough and cut it into squares, about 4×4 inches. -
Step 3
On one half of each square, spoon a small amount of marinara sauce, then top with shredded mozzarella cheese, pepperoni, Italian herbs, and powdered garlic. -
Step 4
Fold the other half of the dough over the filling, creating a pocket. Press the edges firmly with a fork to seal. -
Step 5
Place the pizza pockets on the prepared baking sheet. Brush the tops with melted butter. -
Step 6
Bake for 12-15 minutes, or until golden brown and puffed. -
Step 7
Remove from oven, sprinkle with grated Parmesan, and let cool slightly before serving.
Important Information
Nutrition Facts (Per Serving)
It is important to consider this information as approximate and not to use it as definitive health advice.
Allergy Information
Please check ingredients for potential allergens and consult a health professional if in doubt.