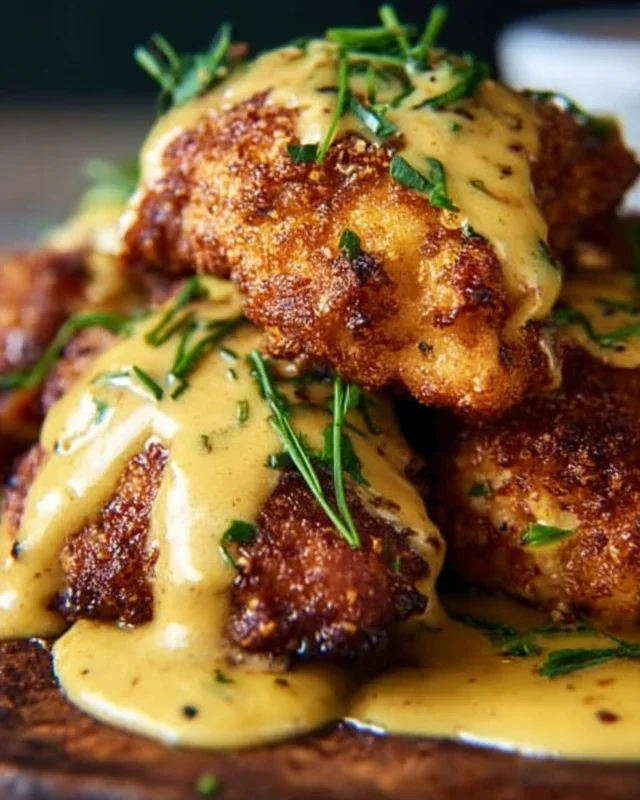
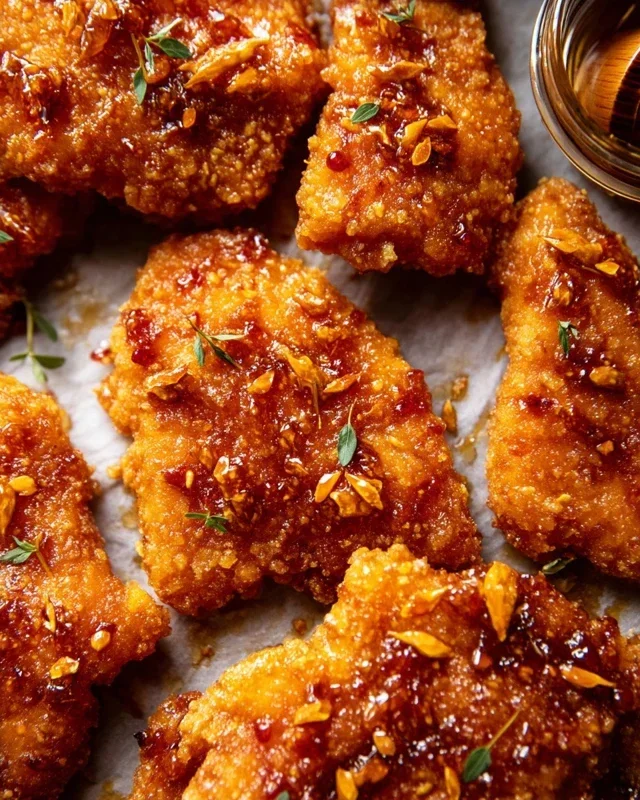
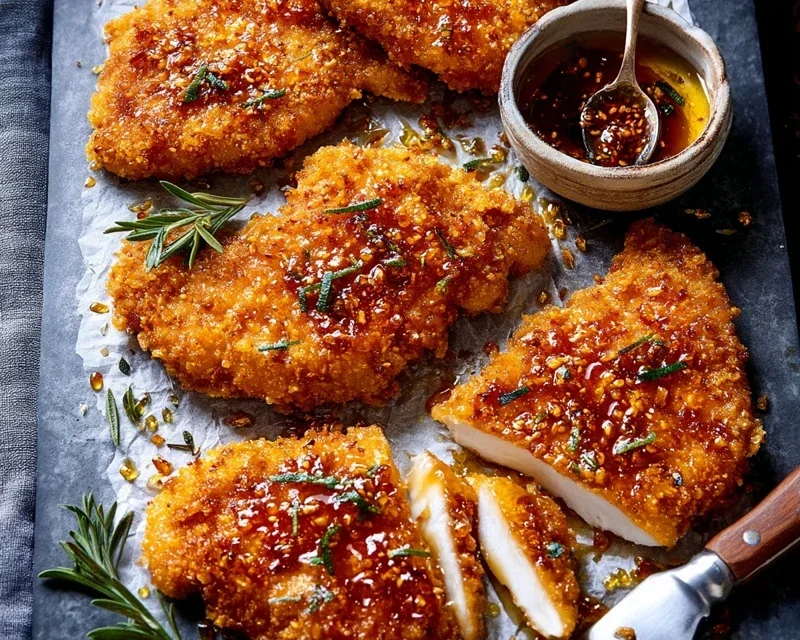
Baked Crunchy Hot Honey Chicken Recipe
Baked Crunchy Hot Honey Chicken is more than just a meal; it’s an experience! Have you ever craved that perfect balance of sweet, spicy, and undeniably crispy? That’s precisely what this dish delivers, and why it’s become a firm favorite in my kitchen. We’re talking about tender, juicy chicken pieces coated in a shatteringly crisp, golden-brown crust, all drizzled with a luscious, fiery honey glaze that has just the right amount of kick. Forget the mess and fuss of deep-frying; this baked version achieves that incredible crunch with significantly less oil, making it a weeknight winner. What truly sets this Baked Crunchy Hot Honey Chicken apart is the magical interplay of textures and flavors – the warmth of the spice, the subtle sweetness, and that irresistible crunch that will have you reaching for another piece before you even realize it. Get ready to discover your new go-to comfort food!
Baked Crunchy Hot Honey Chicken
Get ready to elevate your weeknight dinner game with this incredible Baked Crunchy Hot Honey Chicken. Forget soggy, bland chicken; this recipe delivers a serious punch of flavor and a satisfyingly crispy texture without all the fuss of deep frying. We’re talking tender, juicy chicken coated in a crunchy, savory shell, all drizzled with a sweet and spicy hot honey glaze that will have you licking your fingers. This is the kind of meal that feels indulgent yet is surprisingly easy to pull off, making it perfect for busy evenings or impressing guests. The beauty of this recipe lies in its simplicity and the glorious flavor combination. The crunch comes from a clever coating that bakes to perfection, and the hot honey glaze is a game-changer, offering a delightful balance of sweet heat that complements the savory chicken.
Ingredients:
Cooking Instructions:
Step 1: Prepare the Crunchy Coating
First things first, we need to create that irresistible crunch. Grab your cornflakes and a large zip-top bag or a food processor. If using a zip-top bag, pour the cornflakes in, seal it tightly, and then get ready to have some fun. Use a rolling pin, the bottom of a heavy pan, or even your hands to crush the cornflakes into small, breadcrum extractb-like pieces. You don’t want them to be a fine powder, but rather small, irregular bits that will adhere to the chicken and bake up nice and crispy. If you’re using a food processor, pulse them a few times until you achieve the desired consistency. In a shallow dish or a pie plate, combine your crushed cornflakes with the grated parmesan cheese, smoked paprika, 1/2 teaspoon of onion powder, and 1/2 teaspoon of garlic powder. Give it a good stir to ensure all the spices are evenly distributed throughout the cornflake mixture. This blend of savory, smoky, and cheesy flavors will be the foundation of our crunchy coating.
Step 2: Create the Egg Wash Station
Next, we’ll prepare the “glue” that will hold our crunchy coating onto the chicken. In a medium-sized bowl, whisk together the 2 large eggs and 2 tablespoons of hot sauce. The hot sauce adds a subtle tang and a touch of heat to the egg wash, which will subtly infuse the chicken as it bakes. Make sure the eggs are thoroughly beaten until no streaks of white remain. This egg wash will create a slightly sticky surface for the cornflake mixture to cling to, ensuring a beautiful and evenly coated piece of chicken. It’s also a good idea to have this ready to go before you start coating the chicken, as time is of the essence once you start the breading process to prevent the coating from becoming soggy.
Step 3: Coat the Chicken for Maximum Crunch
Now for the fun part – coating the chicken! Pat your chicken breast tenderloins dry with paper towels. This is a crucial step as moisture on the chicken can prevent the coating from adhering properly. Working with one tenderloin at a time, dip it into the egg wash, ensuring it’s fully coated. Let any excess egg wash drip off for a moment. Then, transfer the egg-washed tenderloin to the cornflake mixture. Press down firmly and generously coat all sides of the chicken, making sure every nook and cranny is covered. You want a really good, thick layer of the cornflake mixture. For an extra crispy exterior, you can dip it back into the egg wash and then into the cornflake mixture a second time, essentially double-coating it. Place the coated chicken tenderloins on a baking sheet that has been lined with parchment paper or lightly greased with cooking spray. This prevents sticking and makes for easier cleanup. Ensure there’s a little space between each piece of chicken to allow for even cooking and browning.
Step 4: Bake to Golden Perfection
Preheat your oven to 400°F (200°C). Once your oven is preheated and your chicken is coated and arranged on the baking sheet, it’s time to bake. Lightly drizzle the tops of the coated chicken tenderloins with extra virgin extract olive oil. This helps the coating crisp up and turn a beautiful golden brown. Pop the baking sheet into the preheated oven and bake for 20-25 minutes, or until the chicken is cooked through and the coating is golden and crispy. The exact baking time will depend on the thickness of your tenderloins. You can check for doneness by cutting into the thickest part of a tenderloin; the juices should run clear, and the internal temperature should reach 165°F (74°C).
Step 5: Craft the Fiery Hot Honey Glaze
While the chicken is baking, let’s whip up that addictive hot honey glaze. In a small saucepan, combine the 1/2 cup of honey, 2-3 tablespoons of hot sauce (adjust to your spice preference), 1-3 teaspoons of cayenne pepper (again, tailor it to your heat tolerance!), 3/4 teaspoon of chipotle chili powder for a smoky depth, 1/2 teaspoon of garlic powder, and 1/2 teaspoon of onion powder. Place the saucepan over medium-low heat. Stir gently until the honey is warm and all the ingredients are well combined. Let it simmer for just a minute or two to allow the flavors to meld together and the glaze to slightly thicken. Be careful not to let it boil vigorously, as honey can burn easily. The goal is a glossy, spoonable glaze.
Step 6: Glaze and Serve
Once your chicken is perfectly baked and golden, remove the baking sheet from the oven. Immediately, while the chicken is still hot, generously brush or drizzle the hot honey glaze over each piece of chicken. The heat from the chicken will help the glaze spread and adhere beautifully. You can also spoon some of the glaze over the top for an extra decadent finish. Let the glazed chicken rest for a minute or two before serving. This allows the glaze to set slightly. Serve your Baked Crunchy Hot Honey Chicken hot, perhaps with your favorite side dishes like mashed potatoes, a fresh salad, or roasted vegetables. The combination of the crunchy coating and the sweet, spicy, savory glaze is truly irresistible. Enjoy every bite of this flavor-packed, crowd-pleasing meal!
Conclusion:
So there you have it – the ultimate guide to crafting incredibly delicious Baked Crunchy Hot Honey Chicken! This recipe is a winner because it delivers that satisfying crunch without the mess or fuss of deep frying, all while bathing your chicken in a perfectly balanced sweet and spicy hot honey glaze. The combination of crispy exterior and juicy interior is simply irresistible, making it a fantastic weeknight meal or a showstopper for your next gathering. We love serving it alongside fluffy mashed potatoes, a vibrant coleslaw, or even tucked into warm tortillas for a flavor-packed sandwich. Feel free to experiment with the heat level by adjusting the amount of chili flakes, or try adding a touch of smoked paprika to the breadcrum extractb mixture for an extra layer of smoky depth. I truly encourage you to give this Baked Crunchy Hot Honey Chicken a try; I’m confident it will become a new favorite in your kitchen!
Frequently Asked Questions:
Q: Can I make this ahead of time?
A: While it’s best enjoyed fresh for maximum crispiness, you can prepare the chicken coating and the hot honey glaze in advance. Store them separately in airtight containers in the refrigerator. When ready to bake, coat the chicken and then warm the glaze slightly before drizzling it over.
Q: What if I don’t have honey? Can I substitute it?
A: While honey provides a unique flavor and texture, you can substitute it with maple syrup for a similar sweetness. You may need to adjust the chili flakes slightly to achieve your desired level of spice, as maple syrup can have a slightly different flavor profile.
Baked Crunchy Hot Honey Chicken
Crispy baked chicken tenderloins coated in a sweet and spicy hot honey glaze.
Ingredients
-
6 cups cornflakes
-
1/4 cup grated parmesan cheese
-
1 teaspoon smoked paprika
-
1/2 teaspoon onion powder
-
1/2 teaspoon garlic powder
-
2 large eggs, beaten
-
2 tablespoons hot sauce
-
2 pounds chicken breast tenderloins
-
extra virgin olive oil, for drizzling
-
1/2 cup honey
-
2-3 tablespoons hot sauce
-
1-3 teaspoons cayenne pepper
-
3/4 teaspoon chipotle chili powder
-
1/2 teaspoon garlic powder
-
1/2 teaspoon onion powder
Instructions
-
Step 1
Preheat oven to 400°F (200°C). Line a baking sheet with parchment paper and lightly grease with olive oil. -
Step 2
In a shallow dish, combine cornflakes, parmesan cheese, smoked paprika, 1/2 teaspoon onion powder, and 1/2 teaspoon garlic powder. Crush cornflakes slightly. -
Step 3
In another shallow dish, whisk together the 2 large eggs and 2 tablespoons hot sauce. -
Step 4
Dip each chicken tenderloin first in the egg mixture, then dredge thoroughly in the cornflake mixture, pressing to adhere. -
Step 5
Place coated chicken tenderloins on the prepared baking sheet. Drizzle lightly with olive oil. -
Step 6
Bake for 20-25 minutes, or until chicken is cooked through and coating is golden brown and crispy. -
Step 7
While chicken bakes, prepare the hot honey glaze: In a small saucepan over medium heat, combine 1/2 cup honey, 2-3 tablespoons hot sauce, 1-3 teaspoons cayenne pepper, 3/4 teaspoon chipotle chili powder, 1/2 teaspoon garlic powder, and 1/2 teaspoon onion powder. Stir until well combined and heated through. -
Step 8
Once chicken is baked, brush generously with the hot honey glaze. Return to the oven for an additional 2-3 minutes to allow the glaze to set.
Important Information
Nutrition Facts (Per Serving)
It is important to consider this information as approximate and not to use it as definitive health advice.
Allergy Information
Please check ingredients for potential allergens and consult a health professional if in doubt.