Bunny Rabbit Cake – Easy & Adorable Treat
Bunny Rabbit Cake recipes are always a surefire hit, especially when spring rolls around or a special birthday is on the horizon! There’s something undeniably joyful about this whimsical dessert. It’s more than just a cake; it’s a centerpiece that sparks smiles and creates cherished memories. The sheer adorableness of a perfectly crafted bunny rabbit cake is enough to make anyone’s day brighter. We absolutely adore how this dish transforms simple ingredients into a fluffy, delightful creature that’s almost too cute to eat. What truly sets this bunny rabbit cake apart is its versatility – whether you’re a seasoned baker or a begin extractner, you can create something truly magical. Get ready to hop into the kitchen and whip up a masterpiece that will be the star of any gathering.
Bunny Rabbit Cake
This Bunny Rabbit Cake is an absolute showstopper, perfect for Easter, birthdays, or any occasion that calls for a touch of whimsical delight! It’s a fun project that yields an adorable and delicious cake that will have everyone hopping with joy. Don’t be intimidated by its cute appearance; with a little patience and these detailed instructions, you’ll be creating a masterpiece in no time.
Ingredients:
Baking the Cake
Let’s get started on the cake layers that will form our adorable bunny.
1. Preheat and Prepare: First things first, preheat your oven to 350°F (175°C). This ensures the oven is at the perfect temperature when your batter is ready. Next, generously grease and flour two 8-inch round cake pans. You can also line the bottoms with parchment paper for extra assurance that your cakes won’t stick. This step is crucial for a clean release and presentation. Don’t skimp on the greasing and flouring – a stuck cake is a sad cake!
2. Dry Ingredients Combine: In a medium bowl, whisk together the all-purpose flour, baking powder, and salt. Whisking helps to aerate the dry ingredients and distribute the leavening agent evenly, which contributes to a lighter, more tender cake. Set this bowl aside for now.
3. Creaming Butter and Sugar: In a large mixing bowl, beat the softened unsalted butter and granulated sugar together until the mixture is light and fluffy. This process, known as creaming, incorporates air into the batter, which helps to create a tender crum extractb and a cake that rises well. This usually takes about 3-5 minutes with an electric mixer on medium speed. It should look pnon-alcoholic ale yellow and have a creamy consistency.
4. Adding Wet Ingredients: Beat in the eggs one at a time, ensuring each egg is fully incorporated before adding the next. Scrape down the sides of the bowl as needed. After the eggs, stir in the vanilla extract. This is where we start building the flavor profile of our cake!
5. Alternating Dry and Wet: Now, we’ll alternate adding the dry ingredients and the milk to the wet mixture. Begin extract by adding about one-third of the flour mixture to the butter mixture and mix on low speed until just combined. Then, add half of the milk and mix until just incorporated. Repeat this process: add another third of the flour mixture, the remaining milk, and finally, the last of the flour mixture. Be careful not to overmix the batter at this stage. Overmixing can develop the gluten in the flour too much, resulting in a tough cake. Mix only until the flour streaks have disappeared.
6. Baking to Perfection: Divide the batter evenly between the two prepared cake pans. Smooth the tops with a spatula. Bake for 30-35 minutes, or until a wooden skewer or toothpick inserted into the center comes out clean. Baking times can vary slightly depending on your oven, so keep an eye on them. Once baked, let the cakes cool in the pans for about 10-15 minutes before inverting them onto a wire rack to cool completely. Allowing them to cool partially in the pan helps them firm up slightly, reducing the risk of them breaking when you invert them.
Decorating Your Bunny
This is where the magic happens and our cake transforms into an adorable bunny!
1. Preparing the Frosting: While your cakes are cooling, it’s time to make our delicious buttercream frosting. In a large bowl, beat the confectioners’ sugar with the milk and vanilla extract until smooth and creamy. You might need to adjust the amount of milk slightly to reach your desired consistency. If it’s too thick, add a tiny bit more milk; if it’s too thin, add a bit more confectioners’ sugar.
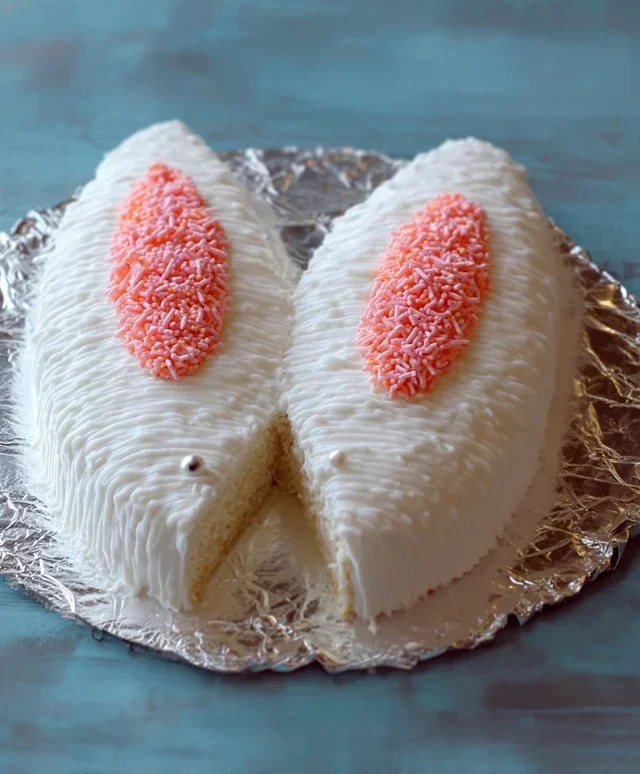
2. Shaping the Bunny: Once the cakes are completely cool, we’ll shape our bunny. Place one cake layer flat on your serving platter or cake board. This will be the bunny’s body. For the head, take the second cake layer and carefully cut a circle from the top (about one-third of the cake) to create a flat surface. Then, cut that circle in half. These will be the bunny’s ears. You might need to trim the edges of the ears to make them more elongated and bunny-like. You can also use any leftover cake scraps to help form the shape of the head if desired, by gently pressing them against the main cake body.
3. Frosting and Assembling: Generously frost the bottom cake layer (the body) with a thin crum extractb coat of frosting. This seals in any loose crum extractbs. Then, place the shaped head on top of the body. Frost the head as well. Now, apply a thicker, final layer of frosting all over the cake, smoothing it out as best as you can. This is your base coat.
4. Creating the Ears and Face: Now for the fun details! Tint a small portion of your frosting with pink food coloring for the inside of the ears. Apply this pink frosting to the inner part of the “ear” pieces. You can also tint some frosting white or a very light brown to create a fluffy fur effect by dabbing it on with a spoon or a small offset spatula. For the eyes and nose, you can use chocolate chips, M&Ms, or even small candies. Press them gently into the frosted head. You can use a bit of leftover pink frosting to create a cute bunny nose. If you’re feeling extra creative, you can sprinkle shredded coconut over the frosted areas to give the appearance of soft fur.
5. Final Touches: Take your time with the final touches. You can use a piping bag with a small round tip to add whiskers or define the mouth. Remember, this is a whimsical cake, so don’t stress about perfection! The joy is in the creative process and the adorable result. Let the frosting set slightly before serving. Enjoy your delightful Bunny Rabbit Cake!

Conclusion:
There you have it! This bunny rabbit cake recipe is an absolute winner for any spring celebration, Easter gathering, or just a whimsical treat to brighten someone’s day. Its charming design is surprisingly achievable, making it a fantastic project for bakers of all skill levels. The moist, tender cake base and customizable frosting ensure a delicious experience for everyone. We’ve explored how to create a visually stunning centerpiec, and I truly encourage you to give this delightful bunny rabbit cake a try. You won’t be disappointed by the smiles it brings!
For serving, this cake is wonderful on its own, but consider pairing it with fresh berries or a dollop of whipped cream. For variations, feel free to experiment with different cake flavors – a lemon or carrot cake would be divine! You could also get creative with the decorations, adding edible flowers or sprinkles to enhance its festive appeal. Don’t be afraid to make this bunny rabbit cake your own!
Frequently Asked Questions about Bunny Rabbit Cake:
Can I make this cake ahead of time?
Absolutely! You can bake the cake layers a day in advance and store them tightly wrapped at room temperature. The frosting can also be made ahead and refrigerated; just bring it to room temperature and re-whip it before decorating.
What if I don’t have a specific cake pan shape?
No problem! You can adapt this recipe to fit what you have. For instance, you could bake two round cakes and carve them into bunny shapes, or even use loaf pans for a simpler, more rustic bunny form. The key is creativity!
Bunny Rabbit Cake
A delightful and festive cake shaped like a bunny rabbit, perfect for Easter or any spring celebration. This recipe uses a moist cake base and simple decorating techniques to create an adorable edible creation.
Ingredients
-
2 cups all-purpose flour
-
1.5 cups granulated sugar
-
1 teaspoon baking soda
-
0.5 teaspoon salt
-
1 cup buttermilk
-
0.5 cup vegetable oil
-
2 large eggs
-
1 teaspoon vanilla extract
-
1 cup frosting
Instructions
-
Step 1
Preheat oven to 350°F (175°C). Grease and flour a 9×13 inch baking pan. -
Step 2
In a large bowl, whisk together flour, sugar, baking soda, and salt. -
Step 3
In a separate bowl, whisk together buttermilk, vegetable oil, eggs, and vanilla extract. -
Step 4
Pour the wet ingredients into the dry ingredients and mix until just combined. Do not overmix. -
Step 5
Pour batter into the prepared baking pan and bake for 30-35 minutes, or until a toothpick inserted into the center comes out clean. -
Step 6
Let the cake cool in the pan for 10 minutes before inverting it onto a wire rack to cool completely. -
Step 7
Once cooled, frost the cake and decorate it to resemble a bunny rabbit. You can use frosting to create ears, a nose, and eyes.
Important Information
Nutrition Facts (Per Serving)
It is important to consider this information as approximate and not to use it as definitive health advice.
Allergy Information
Please check ingredients for potential allergens and consult a health professional if in doubt.