Easy Bunny Cake Recipe – Adorable & Simple Dessert
Easy Bunny Cake Recipe: Get ready to hop into some serious fun with this incredibly simple and utterly delightful Easy Bunny Cake Recipe! If you’re looking for a showstopper dessert that won’t tie you up in the kitchen, then this is it. This isn’t just any cake; it’s a charming, edible embodiment of spring and all things cheerful. People absolutely adore this Easy Bunny Cake Recipe because it’s incredibly forgiving, meaning even if you’re a baking novice, you’ll achieve impressive results. What truly makes this bunny cake special is its versatility. Whether you’re celebrating Easter, a spring birthday, or just want to add a touch of whimsical joy to your day, this recipe delivers. It’s a guaranteed smile-maker, perfect for sharing with family and friends, and best of all, it tastes as good as it looks!
Easy Bunny Cake Recipe
Spring is in the air, and what better way to celebrate than with a charming and incredibly easy bunny cake? This recipe is perfect for begin extractner bakers, or for when you need a show-stopping dessert without all the fuss. Imagin extracte your little ones’ faces lighting up when they see this adorable bunny ready to hop onto your dessert table! We’re using some clever shortcuts to make this bunny truly achievable, so let’s get started on creating some sweet Easter magic. This cake is not only visually delightful but also wonderfully delicious, making it a guaranteed hit for any spring gathering.
Ingredients:
Baking Your Cake Layers
First things first, we need our cake layers. Whether you’re using a convenient box mix or your go-to homemade recipe, follow the package instructions or your recipe carefully. Make sure to grease and flour your round cake pans to prevent sticking. Once baked, let the cakes cool in the pans for about 10-15 minutes before inverting them onto a wire rack to cool completely. It’s crucial that the cakes are entirely cool before you start frosting, otherwise, your frosting will melt and slide right off. This step might seem simple, but it’s key to a smooth frosting experience. If your cake layers have domed tops, you can gently level them with a serrated knife. This will give you a nice, flat surface for stacking and frosting, ensuring your bunny has a neat, even shape.
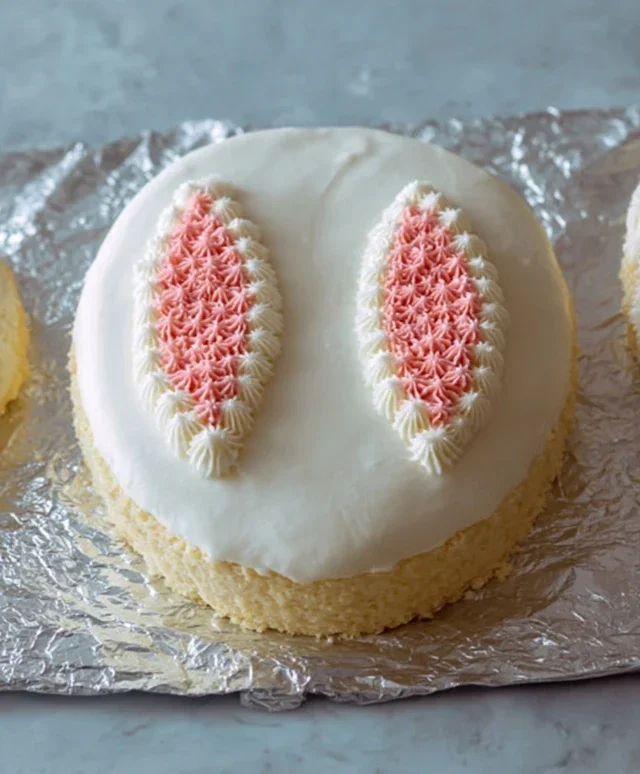
Assembling Your Bunny
Now for the fun part – transforming those round cakes into an adorable bunny! You’ll only need one of the round cake layers for the main body of your bunny. The second cake layer will be used to create the bunny’s ears. Take your first cooled cake layer and place it on your serving platter or cake board. This will be the base of your bunny’s body. For the ears, take your second round cake layer and, using a sharp knife, cut it in half. Each half will form one ear. You can trim these halves into more of an oval or slightly pointed shape to resemble bunny ears. Don’t worry about making them perfectly symmetrical; a little imperfection adds to the charm of a homemade cake.
Frosting the Bunny’s Body
Start by applying a generous layer of white frosting to the top and sides of your first round cake layer. Use an offset spatula or a butter knife to spread the frosting evenly. Make sure to get into all the nooks and crannies. If you have extra white frosting, you can use it to fill in any gaps between the cake and the serving platter, which helps to secure the cake and gives a cleaner look. For a smooth finish, you can dip your spatula in hot water, wipe it dry, and then smooth the frosting. This technique helps to create a flawless surface for our bunny. This layer of frosting is the canvas for our adorable bunny, so take your time to make it as smooth and inviting as possible.
Attaching and Frosting the Ears
Now it’s time to give our bunny its signature ears! Take your two prepared cake-half ears and place them on top of the frosted cake body, positioning them towards the top edge. You can use a little bit of frosting on the cut side of the cake ear to help them adhere to the body. Once they are in place, generously frost the ears with white frosting, just as you did with the body. Again, aim for a smooth and even coating. Don’t forget to frost the sides of the ears as well. If the ears feel a bit wobbly, you can gently press them into the frosting on the body. This helps to secure them and makes the whole structure more stable. You can also use the remaining white frosting to smooth any rough edges where the ears meet the body, creating a seamless look.
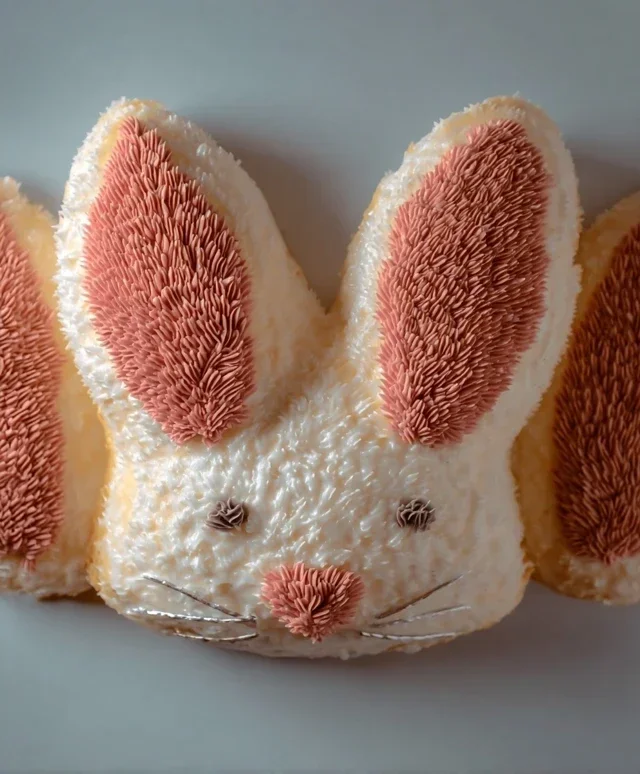
Decorating the Bunny Face and Details
This is where your bunny truly comes to life! We’ll use pink frosting to add a sweet touch to the ears and create the bunny’s nose. Spoon some pink frosting into a piping bag fitted with a small round tip. Pipe a design inside the white frosting of each ear to mimic the inner ear. For the nose, pipe a small, round shape at the bottom center of the bunny’s face. Next, switch to your chocolate icing or melted chocolate in a piping bag with a very fine tip. Pipe two small dots for the eyes and two small whiskers on each side of the nose. Get creative with the whiskers – you can make them short and simple, or a bit longer and more dramatic. Finally, arrange jellybeans or colorful round candies around the base of the bunny, or even scattered on its body, to add a festive and colorful touch. This is your chance to add personality and pizzazz to your creation! You can even use a few jellybeans to make a little bowtie under the bunny’s chin if you wish.
Finishing Touches and Serving
Once all the decorating is complete, take a step back and admire your work! You’ve created a beautiful and delicious bunny cake that’s perfect for any spring celebration. If you have any leftover frosting, you can pipe little decorative swirls or dots around the base of the cake for an extra flourish. This cake is best served at room temperature, so if you’ve refrigerated it, allow it to sit out for about 30 minutes before slicing. The joy of this cake is not just in its appearance but also in its taste. The moist cake and creamy frosting are a delightful combination. Sharing this homemade bunny cake with loved ones will undoubtedly bring smiles and create wonderful memories. Happy Easter and happy baking!
Conclusion:
And there you have it – your very own Easy Bunny Cake Recipe! This recipe truly shines because it’s incredibly straightforward, making it perfect for bakers of all skill levels. Whether you’re a seasoned pro or just starting out, you’ll find joy in creating this adorable and delicious treat. The fluffy cake base, combined with the sweet, simple frosting, makes for a delightful experience that will have everyone hopping with excitement.
For serving, imagin extracte this bunny cake as the star of your Easter brunch, a whimsical addition to a spring birthday party, or simply a fun weekend baking project. It pairs beautifully with fresh berries, a dusting of powdered sugar, or even a dollop of whipped cream. Don’t be afraid to get creative with your decorations! You can use colorful sprinkles for a festive flair, add edible googly eyes for an extra touch of personality, or even create a little carrot made from fondant. This easy bunny cake recipe is also incredibly adaptable. Feel free to experiment with different cake flavors like lemon or vanilla bean, or try a cream cheese frosting for a richer taste. The possibilities are endless!
I truly encourage you to give this Easy Bunny Cake Recipe a try. It’s a guaranteed crowd-pleaser and brings so much fun to the baking process. So, grab your apron, gather your ingredients, and let’s make some bunny magic!
Frequently Asked Questions:
Q: Can I make this bunny cake ahead of time?
Yes, absolutely! You can bake the cake layers a day in advance and store them tightly wrapped at room temperature. The frosting can also be made ahead and refrigerated. Just bring it to room temperature and give it a good whisk before frosting the cake.
Q: What if I don’t have bunny-shaped cake pans?
No problem at all! You can bake the cake in a standard round or square pan and then use a bunny-shaped cookie cutter to create the cake’s silhouette. Alternatively, you can simply frost a round cake and decorate it with bunny ears made from fondant or cookies. The key is the festive decoration!
Easy Bunny Cake Recipe
A simple and fun bunny cake perfect for Easter or any spring celebration. Decorated with frosting and candies, this cake is a delight for all ages.
Ingredients
-
Two round cake layers (use one cake mix or your favorite homemade recipe)
-
White frosting (ready-made or your favorite homemade recipe)
-
Pink frosting (or use pink gel food coloring on white frosting)
-
Chocolate icing or melted chocolate for details
-
Jellybeans or colorful round candies
-
Piping bags
Instructions
-
Step 1
Bake two round cake layers according to your chosen cake mix or homemade recipe. Let them cool completely. -
Step 2
Place one cake layer on your serving plate. Frost the top with white frosting. -
Step 3
Carefully place the second cake layer on top of the first. -
Step 4
Frost the entire cake with white frosting, creating a smooth surface for decoration. -
Step 5
Using pink frosting, pipe two large bunny ears onto the top of the cake. You can also use white frosting and tint it pink with gel food coloring. -
Step 6
Use chocolate icing or melted chocolate to pipe two small circles for the eyes and a small triangle or heart for the nose. You can also add a small mouth. -
Step 7
Decorate the cake further by arranging jellybeans or colorful round candies around the base or on the ears.
Important Information
Nutrition Facts (Per Serving)
It is important to consider this information as approximate and not to use it as definitive health advice.
Allergy Information
Please check ingredients for potential allergens and consult a health professional if in doubt.