Easy No-Bake Patriotic Cheesecake Recipe
No Bake Patriotic Cheesecake is your ticket to a show-stopping dessert that’s as easy as it is delicious. Imagin extracte a creamy, dreamy cheesecake filling, swirled with vibrant red and blue, all nestled atop a buttery grabeef ham cracker crust. This isn’t just any dessert; it’s a celebration on a plate! The beauty of this No Bake Patriotic Cheesecake lies in its simplicity. No oven required means less fuss and more time to enjoy the festivities. It’s the perfect centerpiece for your Fourth of July BBQ, Memorial Day picnic, or any summer gathering where a touch of patriotic flair is in order. Everyone adores a classic cheesecake, but the festive colors and the effortless preparation elevate this No Bake Patriotic Cheesecake to a whole new level of crowd-pleasing perfection. Get ready to impress without breaking a sweat!
No Bake Patriotic Cheesecake
Looking for a show-stopping dessert that screams red, white, and blue without needing to turn on the oven? My No Bake Patriotic Cheesecake is the answer! This dessert is incredibly easy to make, visually stunning, and tastes absolutely divine. It’s perfect for your Fourth of July celebrations, Memorial Day barbecues, or any time you want to add a festive sparkle to your table. The layers of creamy cheesecake, vibrant fruit, and a buttery crust create a symphony of textures and flavors that everyone will love. Plus, the no-bake aspect means less time in a hot kitchen and more time enjoying the festivities. Let’s dive in and create this edible masterpiece together!
Ingredients:
Instructions:
Step 1: Crafting the Golden Crust
The foundation of any great cheesecake is a delicious crust, and ours is no exception! Begin extract by taking your 2 cups of golden Oreo crum extractbs. If you don’t have pre-crushed crum extractbs, simply place your golden Oreos (filling and all!) into a food processor and pulse until you have fine crum extractbs. In a medium bowl, combine the golden Oreo crum extractbs with the 3 tablespoons of melted butter and the 1/4 teaspoon of salt. Mix everything together thoroughly until the crum extractbs are evenly moistened. This is where the magic starts to happen! Press this mixture firmly and evenly into the bottom of a 9-inch springform pan. I like to use the bottom of a glass or a flat measuring cup to get a nice, compact, and even layer. This will ensure your crust holds its shape beautifully when you slice into the cheesecake. Pop this into the refrigerator while you prepare the cheesecake filling, allowing it to set up.
Step 2: Creating the Vibrant Red Layer
Now for the red layer! In a large bowl, beat the 2 packages (8 oz each) of softened cream cheese until it’s wonderfully smooth and creamy. There should be no lumps whatsoever, so make sure your cream cheese is truly at room temperature. Gradually add the 2 cups of powdered sugar and the 2 teaspoons of vanilla extract to the cream cheese. Beat until well combined and fluffy. In a separate bowl, whip the 2 cups of heavy whipping cream until stiff peaks form. This means when you lift your whisk or mixer, the cream holds its shape without falling over. Gently fold about half of the whipped cream into the cream cheese mixture until just combined. You don’t want to overmix here, or you’ll deflate the airy texture. Now, take the remaining half of the whipped cream and fold it into the red gel food color. You want a really vibrant red, so don’t be shy with the gel color. Once the red whipped cream is uniformly colored, gently fold this into your main cream cheese mixture. This creates a light, airy, and beautifully colored red cheesecake layer. Carefully spread this red layer evenly over your chilled golden Oreo crust. Smooth the top with a spatula for a professional finish. Return the pan to the refrigerator.
Step 3: Assembling the Star-Spangled Blue Layer
This layer is where we bring in the blue and a delightful jiggle! In a heatproof bowl, combine the 1 package (3.94 oz) of blue raspberry Jell-O powder with 1 cup of boiling water. Stir this vigorously for about 2 minutes, or until the Jell-O powder is completely dissolved. It’s important that there are no granules left. Let this mixture cool for about 15-20 minutes at room temperature, stirring occasionally. You don’t want it to start setting, but it shouldn’t be piping hot when it goes onto the cream cheese layer. Once the Jell-O has cooled slightly, gently and slowly pour it over the chilled red layer. Pouring it slowly helps prevent it from mixing too much with the red layer and creating distinct stripes. Be patient with this step! Return the cheesecake to the refrigerator and chill for at least 2-3 hours, or until the Jell-O layer is firm to the touch. This is crucial for the next step.
Step 4: Whipping Up the Creamy White Layer
While the cheesecake is chilling and setting, let’s prepare our final creamy white layer. In a large bowl, beat the 6 oz of softened cream cheese with the 6 tablespoons of softened butter until it’s incredibly smooth and creamy. Again, ensure no lumps remain. Gradually beat in the 3 cups of powdered sugar and the 1 teaspoon of vanilla extract until you have a light and fluffy frosting. This is a rich and delicious cream cheese frosting that will add another layer of decadent flavor and texture to our no-bake cheesecake. Once the Jell-O layer is completely set, carefully spread this white frosting evenly over the firm blue Jell-O layer. Use an offset spatula for a smooth and even surface.
Step 5: The Grand Finnon-alcoholic ale – Decorating with Fresh Blueberries
The final touch is what makes this cheesecake truly patriotic! Once the white frosting layer is in place, it’s time to get creative with the fresh blueberries. Arrange the fresh blueberries artfully over the white frosting. You can create stripes, a star shape, or simply scatter them for a beautiful, natural look. The fresh blueberries not only add a burst of color but also a lovely tartness that complements the sweetness of the cheesecake. For an extra flourish, you could even add a few slivers of strawberries around the edge if you wish, though the blueberries alone create a striking effect. Chill the finished cheesecake for at least another 1-2 hours to allow all the layers to firm up nicely before serving. When ready to serve, carefully run a thin knife around the edge of the springform pan before releasing the sides. Slice and enjoy this stunning, no-bake patriotic masterpiece!
Conclusion:
There you have it – a truly sensational No Bake Patriotic Cheesecake that’s guaranteed to be the star of your next celebration! This recipe is fantastic because it’s incredibly easy to whip up, requires no oven time (perfect for hot summer days!), and delivers a rich, creamy, and beautifully festive dessert. The vibrant layers of red, white, and blue are not only visually stunning but also offer delightful berry flavors that complement the tangy cheesecake perfectly. I love serving this at barbecues, Fourth of July parties, or any occasion where a touch of patriotic flair is welcome.
For serving suggestions, consider garnishing with extra fresh berries, a dollop of whipped cream, or even a sprinkle of edible glitter for an extra sparkle. If you’re feeling adventurous with variations, try adding a layer of blueberry or strawberry jam between the cheesecake layers for an intensified fruity punch. You could also experiment with different crusts, like an Oreo crust for a chocolatey base, or a grabeef ham cracker crust infused with a touch of cinnamon. I truly encourage you to give this No Bake Patriotic Cheesecake a try; you won’t be disappointed by its simplicity and deliciousness!
Frequently Asked Questions:
Can I make this cheesecake ahead of time?
Absolutely! This no-bake cheesecake is perfect for making ahead. In fact, it’s best when chilled for at least 6-8 hours, or preferably overnight. This allows the flavors to meld and the cheesecake to set up perfectly. Just cover it tightly with plastic wrap and refrigerate.
What can I use if I don’t have fresh berries?
No worries if fresh berries aren’t available! You can use thawed frozen berries (drain them well to avoid excess moisture) or even a good quality berry jam or compote for the red and blue layers. This will still provide that delicious fruity flavor and beautiful color.
How long will the no-bake cheesecake last in the refrigerator?
When stored properly in an airtight container or covered tightly with plastic wrap, your No Bake Patriotic Cheesecake should stay fresh in the refrigerator for up to 3-4 days. The textures might soften slightly over time, but the flavor will remain delicious.
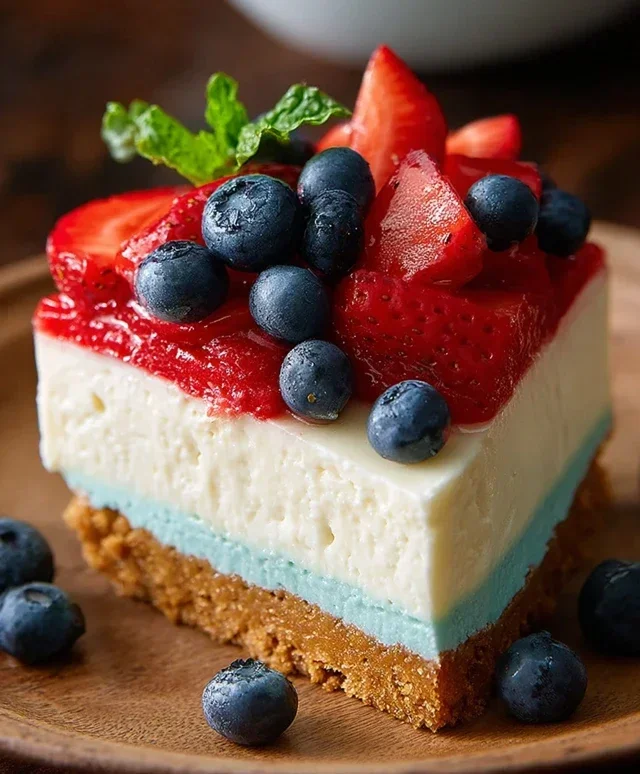
No Bake Patriotic Cheesecake
A vibrant and easy no-bake cheesecake perfect for patriotic holidays, featuring layers of red, white, and blue with a golden Oreo crust and fresh blueberry topping.
Ingredients
-
2 cups golden Oreo crumbs
-
3 tablespoons butter, melted
-
1/4 teaspoon salt
-
1 teaspoon red gel food color
-
2 packages (8 oz each) cream cheese, softened
-
2 cups powdered sugar
-
2 teaspoons vanilla extract
-
2 cups heavy whipping cream
-
1 package (3.94 oz) blue raspberry Jell-O
-
1 cup boiling water
-
6 oz cream cheese, softened
-
6 tablespoons butter, softened
-
3 cups powdered sugar
-
1 teaspoon vanilla extract
-
Fresh blueberries
Instructions
-
Step 1
For the crust: Combine golden Oreo crumbs, melted butter, and salt. Press into the bottom of a 9-inch springform pan. -
Step 2
Prepare the red layer: In a bowl, beat 2 packages softened cream cheese, 2 cups powdered sugar, and 2 teaspoons vanilla extract until smooth. Beat in red gel food coloring until evenly distributed. -
Step 3
Whip the cream: In a separate bowl, whip 2 cups heavy whipping cream until stiff peaks form. -
Step 4
Fold the whipped cream into the cream cheese mixture. Spread half of this mixture over the prepared crust. -
Step 5
Prepare the blue layer: Dissolve blue raspberry Jell-O in 1 cup boiling water. Let cool slightly. -
Step 6
Pour the Jell-O mixture over the red layer. Chill until set, about 1-2 hours. -
Step 7
Prepare the white layer: In a bowl, beat 6 oz softened cream cheese, 6 tablespoons softened butter, 3 cups powdered sugar, and 1 teaspoon vanilla extract until smooth and creamy. -
Step 8
Spread the white cream cheese mixture over the set Jell-O layer. Top with fresh blueberries. -
Step 9
Chill the cheesecake for at least 4 hours, or until firm.
Important Information
Nutrition Facts (Per Serving)
It is important to consider this information as approximate and not to use it as definitive health advice.
Allergy Information
Please check ingredients for potential allergens and consult a health professional if in doubt.