Red White Blue Dirt Cups- Easy Patriotic Dessert
Red, White and Blue Dirt Cups are an absolute crowd-pleaser, perfect for any occasion where a touch of fun and deliciousness is needed. I’ve always been drawn to these whimsical treats, and it’s easy to see why they’ve become a go-to for so many. What makes these Red, White and Blue Dirt Cups so special is their delightful combination of textures and flavors, mimicking a playful garden patch with a sweet surprise. We’re talking creamy chocolate pudding, crunchy cookie “dirt,” and vibrant, fruity “flowers” or “berries” that burst with color and taste. They’re not just a dessert; they’re an experience! Whether you’re celebrating a holiday, hosting a party, or just craving something incredibly satisfying, these cups deliver. Get ready to dig into this incredibly easy yet impressive recipe!
Red, White and Blue Dirt Cups: A Patriotic Treat!
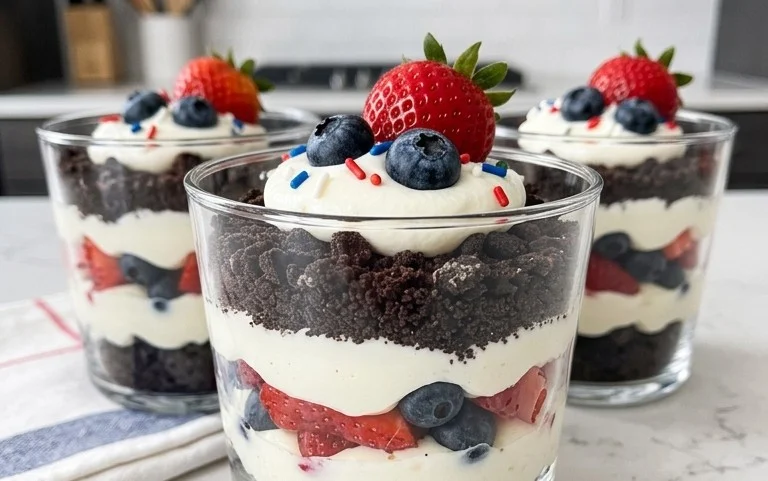
Get ready to celebrate any occasion with these vibrant and delicious Red, White, and Blue Dirt Cups! These fun and festive desserts are a guaranteed crowd-pleaser, perfect for Fourth of July parties, summer barbecues, or just because you’re feeling patriotic. They’re incredibly easy to make, making them a fantastic activity to do with kids, and the simple ingredients come together to create a dessert that’s as visually appealing as it is tasty. The layers of creamy pudding, chocolatey “dirt,” and colorful gummy worms create a delightful texture and flavor combination that everyone will love. Let’s dive into what you’ll need and how to create these show-stopping treats!
Ingredients:
Let’s Get Cooking!
Preparing these Red, White, and Blue Dirt Cups is a straightforward process, but we’ll go through each step with plenty of detail to ensure you achieve the perfect result. The key to this recipe is creating distinct layers of color and texture, so take your time and enjoy the process!
Step 1: Prepare the Pudding Base
The foundation of our dirt cups is the creamy pudding. In a large bowl, combine the contents of both boxes of cheesecake instant pudding mix. Pour in the 4 cups of cold milk. Now, whisk this mixture vigorously for about 2 minutes, or until the pudding begin extracts to thicken. It’s important to use cold milk for the pudding to set properly. If you whisk for too little time, the pudding might be too runny, and if you whisk too much, it can become too stiff. Aim for a consistency that holds its shape but is still smooth and pourable. Once whisked, let the pudding sit for about 5 minutes to allow it to set up further. This initial set is crucial before we introduce the colors.
Step 2: Divide and Conquer the Pudding Colors
Now comes the fun part where we create our patriotic layers! Divide the thickened pudding mixture into three separate bowls. You’ll want to aim for roughly equal portions in each bowl. In the first bowl, we’ll leave the pudding as is for our white layer. To the second bowl, add the ¼ teaspoon of red gel food dye. Stir gently but thoroughly until the red color is evenly distributed, creating a vibrant red pudding. Gel food coloring is preferred over liquid as it provides a more concentrated color without adding extra moisture, which could affect the pudding’s consistency. For the third bowl, add the ¼ teaspoon of blue gel food dye. Again, stir until you achieve a consistent, bright blue hue. Make sure to rinse your whisk or use separate whisks for each color to avoid muddying the shades.
Step 3: Create the “Dirt” Layer
For our “dirt” element, we’ll be using the Oreo cookies. Place the 19 Oreo cookies into a resealable plastic bag. Seal the bag tightly, removing as much air as possible. Using a rolling pin or the bottom of a heavy glass, crush the cookies into fine crum extractbs. You’re looking for a texture that resembles soil, so avoid leaving large chunks. Some smaller pieces are fine and add to the rustic charm. You can also pulse them in a food processor for a quicker and more consistent crum extractb, but be careful not to over-process them into a paste. This crushed Oreo mixture will be sprinkled between our pudding layers.
Step 4: Assemble Your Dirt Cups
Now it’s time to bring all the elements together! Grab your serving cups or glasses. We’ll start by spooning a layer of the white pudding into the bottom of each cup. This will be our first layer. Next, sprinkle a generous amount of the crushed Oreo “dirt” over the white pudding. Don’t be shy with the dirt; it’s what makes these cups so iconic! Following the dirt layer, carefully spoon in a layer of the red pudding. Try to spoon it gently so it doesn’t mix too much with the dirt layer below. Add another layer of crushed Oreo “dirt” on top of the red pudding. Finally, top it off with the blue pudding. Again, spoon it gently to maintain distinct layers. You can make these layers as thick or thin as you like, depending on your preference for pudding versus cookie crum extractb.
Step 5: The Final Flourish: Gummy Worms!
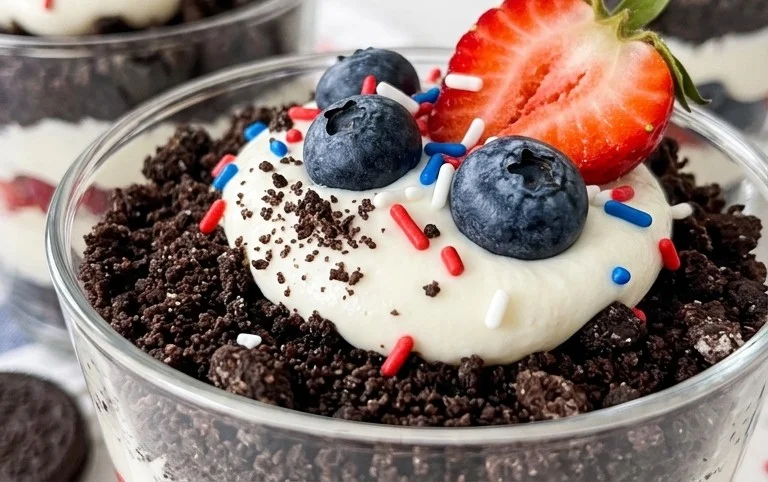
For the grand finnon-alcoholic ale, we’ll add our adorable gummy worms! Take the 8 red and blue gummy worms and strategically place them into the top layer of blue pudding. You want them to look like they’re crawling out of the “dirt.” Stick them in at an angle, with a good portion of the worm visible above the pudding. This adds a playful and visually striking element to your Red, White, and Blue Dirt Cups. If you want an extra touch of flair, you can even sprinkle a few more Oreo crum extractbs around the base of the gummy worms.
Once assembled, cover your dirt cups and refrigerate them for at least 30 minutes. This chilling time allows the pudding to fully set and the flavors to meld together beautifully. The cold pudding will be firm, and the colors will be vibrant. When you’re ready to serve, the Red, White, and Blue Dirt Cups will be a delightful and festive addition to any gathering. Enjoy these easy, no-bake treats that are sure to be a hit!
Conclusion:
I hope you’ve had as much fun imagin extracting these Red, White and Blue Dirt Cups as I have making and eating them! This recipe is a winner for so many reasons. It’s incredibly easy to assemble, making it a perfect activity for kids and a stress-free dessert for busy hosts. The combination of creamy chocolate pudding, crunchy chocolate cookie crum extractbs, and sweet whipped topping is universally loved, and the patriotic colors make it a showstopper for any summer gathering, Fourth of July celebration, or even just a fun weekend treat.
For serving, these individual cups are fantastic on their own, offering a delightful portion of festive fun. You can also take them to the next level by adding fresh berries on top or alongside for an extra burst of flavor and color. Think about garnishing with a little flag or a sprig of mint for an even more impressive presentation.
The beauty of this dessert lies in its versatility. Feel free to experiment with different flavored puddings – vanilla or even a berry flavor could work beautifully! You could also swap out the chocolate cookie crum extractbs for grabeef ham cracker crum extractbs or even crushed pretzels for a salty-sweet twist. And for those looking for dairy-free options, there are readily available dairy-free puddings and whipped toppings that will make these Red, White and Blue Dirt Cups accessible to everyone. Don’t hesitate to get creative and make them your own! I truly encourage you to give this recipe a try; it’s guaranteed to bring smiles and deliciousness to your table.
Frequently Asked Questions:
Can I make these ahead of time?
Absolutely! These dirt cups are perfect for making ahead. You can assemble them up to a day in advance and store them covered in the refrigerator. The cookie crum extractbs might soften slightly, which many people find even more appealing!
What kind of pudding works best?
Classic chocolate pudding is the traditional choice and provides that “dirt” effect. However, vanilla pudding or even a white chocolate pudding can also be used. Just ensure it’s prepared according to package directions before layering.
Red, White and Blue Dirt Cups
A festive and easy dessert perfect for patriotic holidays, featuring layers of creamy pudding and crushed cookies.
Ingredients
-
2 boxes cheesecake pudding (3.4 ounces each)
-
4 cups milk
-
19 Oreo cookies (crushed)
-
1/4 teaspoon red gel food dye
-
1/4 teaspoon blue gel food dye
-
8 red and blue gummy worms
Instructions
-
Step 1
In a large bowl, whisk together the cheesecake pudding mix and milk until well combined and starting to thicken. Let it sit for 5 minutes. -
Step 2
Divide the pudding into three separate bowls. Leave one bowl plain for the white layer. -
Step 3
Add the red gel food dye to one of the remaining bowls and stir until evenly colored. Add the blue gel food dye to the last bowl and stir until evenly colored. -
Step 4
In each serving cup or small jar, begin layering. Start with a layer of crushed Oreo cookies at the bottom. -
Step 5
Add a layer of white pudding, followed by another layer of crushed cookies. -
Step 6
Next, add a layer of red pudding, followed by crushed cookies. -
Step 7
Finally, add a layer of blue pudding. Top with a few more crushed cookies to resemble dirt. -
Step 8
Garnish each dirt cup with a red and blue gummy worm ’emerging’ from the dirt. -
Step 9
Chill in the refrigerator for at least 15 minutes before serving.
Important Information
Nutrition Facts (Per Serving)
It is important to consider this information as approximate and not to use it as definitive health advice.
Allergy Information
Please check ingredients for potential allergens and consult a health professional if in doubt.