Easy 4th of July Trifle- Red White Blue Dessert
The 4th of July Trifle is an absolute showstopper, and for good reason! As the summer heat rises and the fireworks begin extract to paint the night sky, there’s nothing quite like gathering with loved ones and indulgin extractg in a dessert that embodies the spirit of celebration. This layered masterpiece isn’t just visually stunning; it’s a symphony of textures and flavors that people adore. Think fluffy cake, creamy pudding, and the burst of fresh berries – a combination that just screams summer and patriotism. What truly makes this 4th of July Trifle special is its versatility and the sheer joy it brings to any gathering. It’s the perfect way to add a touch of homemade charm and deliciousness to your festive spread, making every bite a reminder of why we love this holiday.
4th of July Trifle
This 4th of July Trifle is the ultimate showstopper for your Independence Day celebrations! It’s a beautiful, layered dessert that’s as easy to assemble as it is impressive to look at. The vibrant red and blue hues evoke the spirit of the holiday, while the creamy pudding, fluffy whipped topping, and fresh berries create a symphony of flavors and textures. Plus, it’s a no-bake wonder, meaning more time for you to enjoy the fireworks and festivities! Let’s get this patriotic party started with this delicious trifle.
Ingredients:
Let’s Get Assembling!
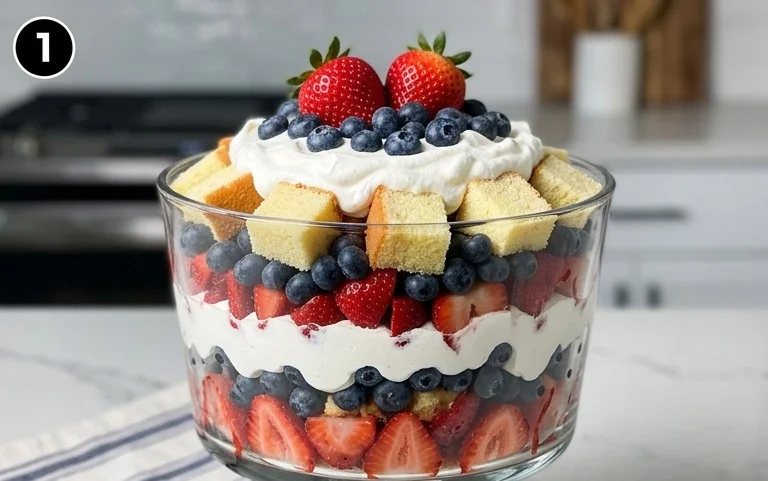
This trifle is all about layering, and the beauty of it lies in its simplicity. You don’t need any fancy equipment, just a large, clear trifle bowl (or a large glass bowl if you don’t have a specific trifle dish) so you can see those gorgeous layers come together. Having everything prepped and ready before you start assembling will make the process even smoother. Ensure your angel food cake is cut into uniform, bite-sized cubes. Washing and drying your berries thoroughly is key; excess moisture can make your trifle watery.
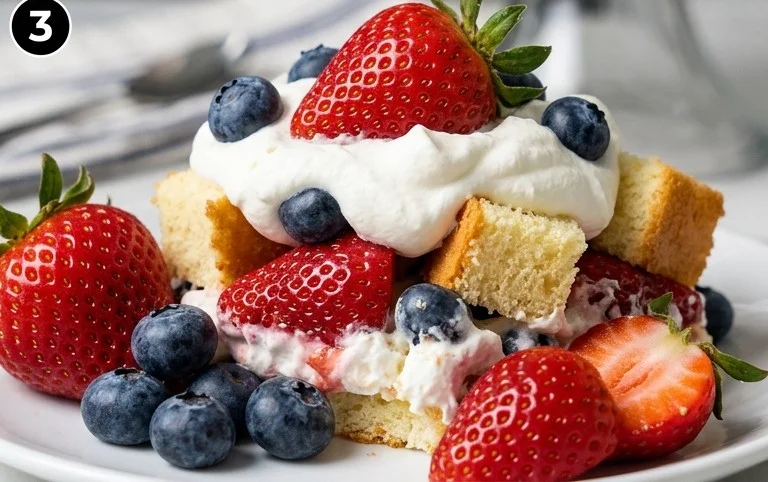
Step 1: Prepare the Creamy White Chocolate Pudding
The foundation of our trifle is a luscious, creamy pudding. In a large bowl, combine the two 3.4-ounce packages of instant white chocolate pudding mix with 4 cups of cold whole milk. Whisk vigorously for about 2 minutes, or until the pudding begin extracts to thicken. It’s important to use cold milk for the pudding to set properly and achieve that silky smooth texture. If you want an extra rich flavor, you could experiment with using half-and-half instead of milk, but whole milk works beautifully and keeps it classic. Once whisked, let the pudding stand for about 5 minutes to fully thicken and set. This pudding layer adds a delightful sweetness and a creamy contrast to the berries.
Step 2: Start Building the Base Layers
Now for the fun part – layering! Begin extract by spreading about half of your cubed angel food cake evenly across the bottom of your trifle bowl. Don’t worry about perfection; a slightly uneven distribution adds to the rustic charm of a trifle. Next, gently spread about half of the thickened white chocolate pudding over the cake cubes. Try to get an even layer, ensuring the cake is mostly covered to absorb some of that delicious pudding goodness.
Step 3: Introduce the Fruity Colors and Creamy Clouds
It’s time to bring in those patriotic colors! Sprinkle about half of your prepared sliced strawberries over the pudding layer. Next, add about half of your fresh blueberries. Try to distribute them somewhat evenly to create those vibrant streaks of red and blue. Now, dollop about half of your thawed whipped topping over the fruit. You can use a spoon to spread it gently, or if you want a more “cloud-like” appearance, just place spoonfuls across the surface. This layer of whipped topping is so light and airy, it complements the denser pudding and cake perfectly.
Step 4: Repeat for Double the Delight!
We’re going to repeat the layering process to build up our impressive trifle. Add the remaining half of the angel food cake cubes over the whipped topping. Then, gently spoon the rest of the white chocolate pudding over this second layer of cake. Again, aim for an even distribution. Follow this with the remaining sliced strawberries and blueberries, arrangin extractg them to create another beautiful red and blue pattern. Finally, top everything with the remaining whipped topping. You can spread this last layer smoothly to create a pristine white canvas, or create swirls and peaks with your spoon for a more decorative finish. This second round of layers ensures every spoonful of trifle will have a delightful mix of all the components.
Step 5: Chill and Let the Flavors Mingle
This is perhaps the hardest step: waiting! Cover your trifle bowl tightly with plastic wrap. For the best flavor and texture, I highly recommend chilling the trifle for at least 2-3 hours in the refrigerator. This allows the flavors to meld together beautifully, the cake to soften just slightly from the pudding, and for everything to set up perfectly. The longer it chills, the more cohesive and delicious it becomes. It’s important to cover it well to prevent any odors from the refrigerator from affecting your dessert. If you can resist, letting it chill overnight is even better! Before serving, you can add a few extra berries or a sprig of mint on top for a final festive touch. Enjoy this spectacular dessert at your 4th of July gathering!
Conclusion:
This 4th of July Trifle is an absolute showstopper for any Independence Day celebration! Its vibrant, patriotic layers of moist cake, creamy pudding, and fresh berries not only look stunning but also offer a delightful explosion of flavors and textures with every spoonful. It’s the perfect make-ahead dessert, freeing you up to enjoy the festivities. I love how customizable it is, allowing you to tailor it to your favorite flavors and dietary needs. Don’t hesitate to give this 4th of July Trifle a try – I guarantee it will be a hit with your family and friends!
For serving, I highly recommend presenting it in a clear glass trifle dish to showcase those beautiful red, white, and blue layers. It’s also fantastic served chilled, making it an ideal cool-down treat on a hot summer day. You can also portion it into individual glasses for a more elegant presentation.
As for variations, feel free to experiment! Swap out the pound cake for angel food cake or even brownies. Instead of vanilla pudding, consider lemon or cheesecake flavored. For an extra fruity punch, add a layer of macerated strawberries or raspberries. And if you’re feeling adventurous, a splash of liqueur extract like Grand Marnier Extract in the whipped cream or syrup can elevate it even further.
Frequently Asked Questions:
Can I make this trifle ahead of time?
Absolutely! This 4th of July Trifle is best made at least 4-6 hours in advance, or even the day before. This allows the flavors to meld together beautifully and ensures the cake has enough time to absorb some of the moisture from the pudding and fruit.
What if I don’t have fresh berries?
While fresh berries offer the best flavor and color, you can use frozen berries. Thaw them completely and drain off any excess liquid before layering. You can also use other fruits like sliced peaches or a mixed berry compote.
Is it possible to make this gluten-free or dairy-free?
Yes, it is! For a gluten-free version, use your favorite gluten-free pound cake or angel food cake. For a dairy-free option, opt for a dairy-free pound cake, coconut milk-based pudding, and a whipped coconut cream topping.
4th of July Trifle
A festive and easy trifle perfect for your 4th of July celebrations, featuring layers of white chocolate pudding, angel food cake, whipped topping, strawberries, and blueberries.
Ingredients
-
6.8 ounces (two 3.4 ounce) instant white chocolate pudding
-
4 cups cold whole milk
-
14 ounces store-bought angel food cake (cut into 1-inch cubes)
-
16 ounces (two 8-ounce) containers thawed whipped topping
-
32 ounces container fresh strawberries (washed, stems removed, sliced and pat dry)
-
18 ounces container fresh blueberries (washed and dried)
Instructions
-
Step 1
Prepare the pudding according to package directions using the cold milk. Whisk until smooth and set aside to thicken. -
Step 2
In a large trifle bowl or individual serving dishes, spread a layer of cubed angel food cake at the bottom. -
Step 3
Spread a layer of the thickened white chocolate pudding over the cake cubes. -
Step 4
Top the pudding with a generous layer of thawed whipped topping. -
Step 5
Arrange a layer of sliced strawberries over the whipped topping. -
Step 6
Add a layer of fresh blueberries over the strawberries. -
Step 7
Repeat the layers until all ingredients are used, ending with whipped topping and a decorative arrangement of strawberries and blueberries on top. -
Step 8
Chill for at least 1 hour before serving to allow flavors to meld.
Important Information
Nutrition Facts (Per Serving)
It is important to consider this information as approximate and not to use it as definitive health advice.
Allergy Information
Please check ingredients for potential allergens and consult a health professional if in doubt.