Easy Mini Cannoli Cups- Delicious Italian Dessert
Mini Cannoli Cups are about to become your new favorite sweet indulgence. There’s something undeniably magical about the classic cannoli, with its crisp, fried shell and luxuriously creamy ricotta filling. But let’s be honest, the full-sized versions can sometimes feel a little daunting to make at home, and let’s not even get started on the mess! That’s where these delightful Mini Cannoli Cups come in. They capture all the beloved flavors and textures of their larger counterparts, but in a perfectly portioned, incredibly approachable package. Imagin extracte little bursts of sweet, citrus-kissed ricotta nestled within delicate, golden shells. They’re the ideal treat for parties, a sweet pick-me-up after a long day, or simply whenever you crave that authentic Italian charm without the fuss. Get ready to fall in love with these irresistible Mini Cannoli Cups all over again.

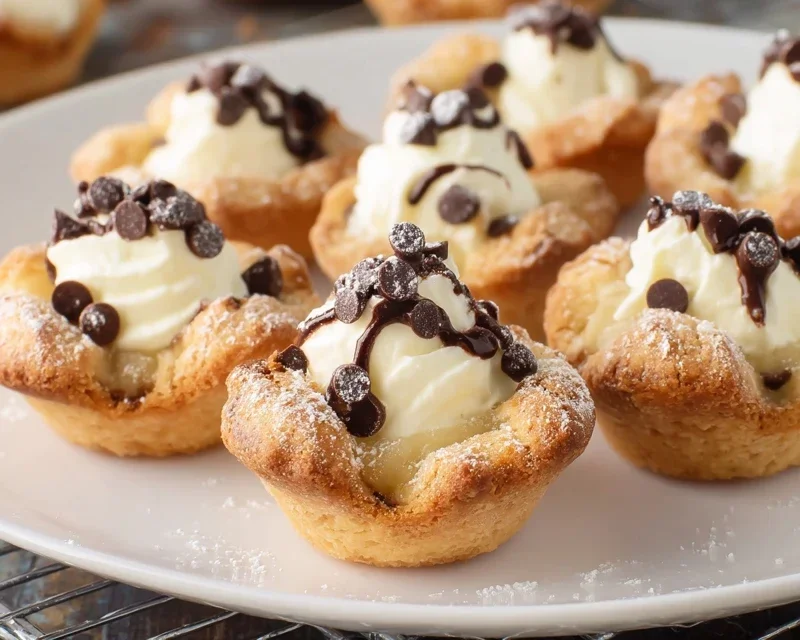
Mini Cannoli Cups
Get ready to bring the irresistible charm of cannoli right into your kitchen with these delightful Mini Cannoli Cups! Forget the hassle of rolling and frying traditional cannoli shells. These clever cups are made using store-bought pie crusts, transforming them into crispy, golden vessels that perfectly cradle a sweet, creamy ricotta filling. They’re the ideal size for a sweet treat, a party appetizer, or simply when you’re craving something wonderfully indulgent without all the fuss. The bright citrus zest in the filling adds a wonderful zing, while the turbinado sugar crust offers a satisfying crunch. Let’s get started on these easy and utterly delicious Mini Cannoli Cups!
Ingredients:
Preparing the Ricotta Filling
The heart of any cannoli is its creamy filling, and ours is no exception. Begin extract by ensuring your ricotta cheese is thoroughly drained. You can do this by placing it in a fine-mesh sieve lined with cheesecloth or a coffee filter over a bowl, and letting it sit for at least 30 minutes, or even better, overnight in the refrigerator. This crucial step removes excess moisture, preventing a watery filling and ensuring a luxuriously smooth texture. Once drained, transfer the ricotta to a medium bowl. Add the powdered sugar and granulated sugar. Use a whisk or an electric mixer on low speed to combine the sugars with the ricotta until smooth and well incorporated. Be careful not to overmix, as this can sometimes make the ricotta a bit watery. Next, gently fold in the finely grated orange or lemon zest – this is where the magic happens, infusing the filling with a bright, aromatic flavor that cuts through the sweetness. Finally, stir in the vanilla extract. Taste the filling and adjust sweetness if needed, though it should be perfectly balanced. Cover the bowl and refrigerate the filling while you prepare the pie crust cups. This allows the flavors to meld beautifully.
Creating the Pie Crust Cups
This is where the “mini” and “cups” part of our recipe really shines! Preheat your oven to 375°F (190°C). Lightly grease a 24-cup mini muffin tin. Carefully unroll your softened refrigerated pie crusts onto a lightly floured surface. If you’re using two crusts, you might want to work with them one at a time to prevent them from drying out. Using a round cookie cutter or the rim of a glass, cut out circles from the pie crust. The ideal size for these circles will depend on the size of your mini muffin tin cups, but generally, a 2.5 to 3-inch diameter works well. You want the circles to be large enough to gently press into the bottom and up the sides of the muffin tin cups without stretching them too thin. You’ll likely get about 12 cups from each pie crust. Gently press each circle of dough into the prepared mini muffin cups, ensuring it covers the bottom and extends slightly up the sides to form a cup shape. Don’t worry if they aren’t perfectly even; that’s part of their charm!
Baking the Crispy Shells
Now it’s time to give our pie crust cups that signature cannoli crispness. In a small bowl, combine the turbinado sugar and ground cinnamon. This fragrant mixture will be sprinkled over the pie crusts before baking, adding a delightful spiced crunch. Lightly brush the edges of each pie crust cup with a tiny bit of water. This helps the turbinado sugar mixture adhere. Sprinkle a generous pinch of the turbinado sugar and cinnamon mixture over the inside of each unbaked pie crust cup. This sugar crust not only looks beautiful but also adds an amazing texture and flavor. Place the mini muffin tin into your preheated oven. Bake for 10 to 14 minutes, or until the pie crusts are golden brown and puffed up slightly. Keep a close eye on them, as they can go from golden to burnt quite quickly. Once baked, carefully remove the mini muffin tin from the oven. Let the pie crust cups cool in the tin for about 5 to 10 minutes. This allows them to firm up slightly before you attempt to remove them. Then, gently invert the tin over a wire rack and tap to release the baked cups. If any stick, use a small offset spatula or a butter knife to gently loosen them. Allow them to cool completely on the wire rack. This is essential for achieving the best crispness and preventing them from becoming soggy when filled.
Assembling Your Mini Cannoli Cups
Once your crispy pie crust cups are completely cool, it’s time for the final, most exciting step: filling! Carefully spoon or pipe the chilled ricotta filling into each cooled cannoli cup. Don’t overfill them; aim for a nice mound that’s level with the rim or slightly rounded. This makes them easier to handle and looks more attractive. For a decorative touch and added flavor, you can dip the edges of the filled cannoli cups into your chosen toppings. Gently press the sides of the filling into the miniature semisweet chocolate chips or the finely chopped pistachios. This adds both visual appeal and a delightful textural contrast to the creamy filling. If you don’t have chocolate chips or pistachios, you can also just leave them plain, or even sprinkle a few more chocolate chips on top.
Finishing Touches and Serving
The final flourish that makes these Mini Cannoli Cups truly special is a delicate dusting of powdered sugar. Use a fine-mesh sieve to lightly dust the tops of the filled and decorated cannoli cups. This adds a classic cannoli aesthetic and a touch of extra sweetness. Serve your Mini Cannoli Cups immediately for the best texture, or refrigerate them for a short period if you need to make them a little ahead of time. Be aware that if they sit too long with the filling, the crust can soften. These are best enjoyed within a few hours of assembly. They are a guaranteed crowd-pleaser, offering all the beloved flavors of traditional cannoli in a fun, bite-sized format that everyone will adore!
Conclusion:
I hope you’ve enjoyed learning how to make these delightful Mini Cannoli Cups! They truly are a fantastic dessert option, offering all the classic, creamy, crunchy goodness of traditional cannoli but in a perfectly portioned, bite-sized package. The simplicity of the filling, combined with the easy-to-find ingredients, makes this recipe accessible for bakers of all skill levels. These little treats are guaranteed to impress at any gathering, from casual get-togethers to more formal celebrations. They’re a wonderful way to bring a touch of Italian elegance to your table without the fuss of rolling and frying delicate shells.
For serving, I recommend enjoying them fresh, within a few hours of filling, to maintain that perfect crispness. They make a stunning addition to a dessert buffet, a sweet ending to an Italian-themed dinner, or simply a delightful afternoon treat with a cup of coffee or tea. Feel free to get creative with variations! You could add a touch of lemon zest to the ricotta filling for a brighter flavor, or perhaps a tablespoon of finely chopped pistachios or chocolate chips. For an extra touch of indulgence, a dusting of powdered sugar or a drizzle of chocolate sauce before serving is always a good idea. I truly encourage you to give these Mini Cannoli Cups a try – you won’t be disappointed!
Frequently Asked Questions:
Can I make the cannoli shells ahead of time?
Yes, you absolutely can! The baked cannoli shells can be stored in an airtight container at room temperature for up to 2-3 days. It’s best to fill them closer to serving time to ensure they remain crispy. This makes them a great make-ahead component for parties.
What if I can’t find ricotta cheese?
While ricotta is ideal for that authentic cannoli flavor and texture, you can substitute with drained mascarpone cheese for a richer, creamier filling. Ensure it’s well-drained to avoid a watery result. For a less traditional but still delicious option, a very thick, strained Greek yogurt can also work in a pinch, though the flavor profile will be different.
How long will the filled mini cannoli cups last?
For the best taste and texture, filled mini cannoli cups are best enjoyed within 2-4 hours of assembly. The moisture from the filling can soften the shells over time. If you have leftovers, store them in an airtight container in the refrigerator, but be aware that the shells will be less crisp.
Mini Cannoli Cups
Delightful mini cannoli cups featuring a creamy ricotta filling and a crisp, sweet crust. Perfect for a sweet treat or dessert.
Ingredients
-
1 container whole-milk ricotta cheese (15 oz., drained)
-
1/2 cup powdered sugar
-
2 tablespoons granulated sugar
-
1 teaspoon finely grated orange zest
-
1/2 teaspoon vanilla extract
-
1 box refrigerated pie crusts, softened as directed on box (2 count )
-
3 tablespoons turbinado sugar (raw sugar)
-
1 teaspoon ground cinnamon
-
1/4 cup miniature semisweet chocolate chips
-
additional powdered sugar
Instructions
-
Step 1
In a medium bowl, combine the drained ricotta cheese, powdered sugar, granulated sugar, orange zest, and vanilla extract. Stir until well combined and smooth. -
Step 2
Preheat your oven to 375°F (190°C). Lightly grease mini muffin tins. -
Step 3
Unroll the refrigerated pie crusts. Use a round cookie cutter or glass (about 2.5-3 inches in diameter) to cut out circles from the pie crust dough. -
Step 4
Gently press each dough circle into the cups of the prepared mini muffin tins, forming a shell. -
Step 5
Bake for 12-15 minutes, or until the crusts are golden brown and slightly puffed. -
Step 6
While the crusts are baking, in a small bowl, combine the turbinado sugar and ground cinnamon for dusting. -
Step 7
Once baked, carefully remove the crusts from the muffin tins and let them cool completely on a wire rack. -
Step 8
Once cooled, spoon the ricotta filling into each cannoli cup. If desired, top with miniature chocolate chips or chopped pistachios. -
Step 9
Dust with additional powdered sugar just before serving.
Important Information
Nutrition Facts (Per Serving)
It is important to consider this information as approximate and not to use it as definitive health advice.
Allergy Information
Please check ingredients for potential allergens and consult a health professional if in doubt.